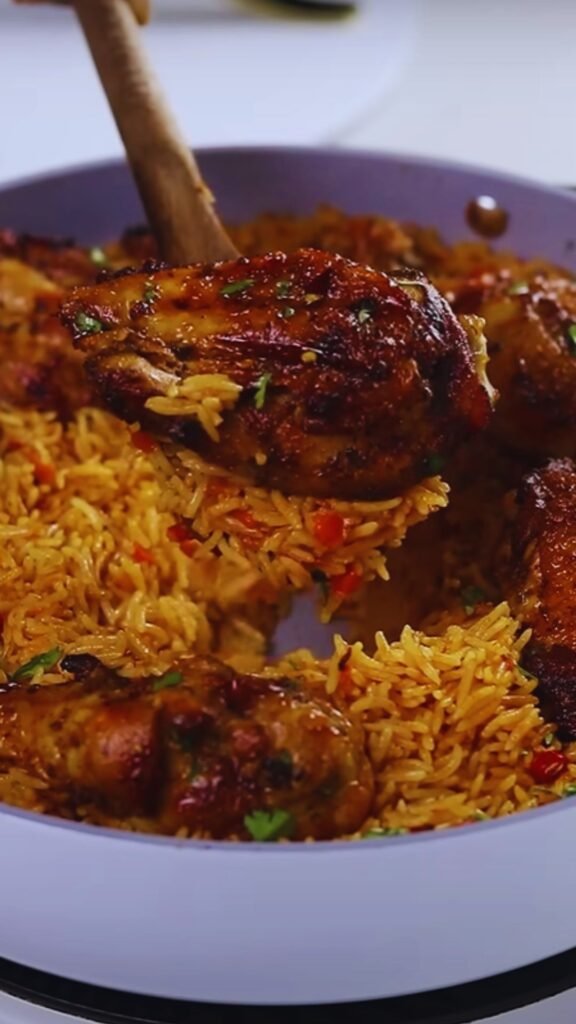
There’s something magical about opening my kitchen door to the aroma of coconut milk simmering with tender chicken and perfectly cooked rice. This one-pot wonder has become my go-to comfort food when I want something exotic yet familiar, complex yet surprisingly simple to prepare. The beauty of this dish lies not just in its incredible flavors, but in how everything comes together in a single pot, making cleanup a breeze.
I discovered this recipe during my culinary adventures, and it quickly became a household favorite. The combination of creamy coconut milk, aromatic jasmine rice, and succulent chicken creates a harmony that’s both satisfying and memorable. What makes this dish particularly special is how the rice absorbs all the coconut-infused flavors while maintaining that perfect sticky texture that pairs beautifully with the tender chicken.
Understanding the Key Components
Coconut Rice: A cooking method where rice is prepared using coconut milk instead of plain water, resulting in a creamy, aromatic grain with subtle sweetness and rich texture.
Sticky Rice Texture: Achieved through proper rice-to-liquid ratios and cooking techniques that allow the grains to absorb maximum moisture while maintaining structural integrity.
One-Pot Cooking: A culinary approach that combines multiple ingredients in a single cooking vessel, allowing flavors to meld while minimizing cleanup and maximizing convenience.
Aromatics: Essential flavor-building ingredients like garlic, ginger, and onions that form the foundation of complex taste profiles in Asian-inspired dishes.
Essential Ingredients Breakdown
The success of this dish depends heavily on ingredient quality and proper ratios. I’ve learned through trial and error that certain components simply cannot be substituted without compromising the final result.
| Ingredient Category | Primary Options | Alternative Options | Quantity per 4 Servings |
|---|---|---|---|
| Rice | Jasmine Rice | Basmati, Short-grain | 1.5 cups |
| Coconut Base | Full-fat Coconut Milk | Light Coconut Milk + Cream | 1 can (14 oz) |
| Protein | Chicken Thighs | Chicken Breast, Drumsticks | 1.5 lbs |
| Aromatics | Fresh Ginger, Garlic | Powdered alternatives | 2 tbsp each |
| Vegetables | Bell Peppers, Snap Peas | Broccoli, Carrots | 1 cup mixed |
| Seasonings | Fish Sauce, Soy Sauce | Coconut Aminos | 2-3 tbsp combined |
Nutritional Profile Analysis
Understanding the nutritional aspects helps me make informed decisions about portion sizes and accompanying dishes. This recipe provides a well-balanced macronutrient profile that satisfies both comfort food cravings and nutritional needs.
| Nutrient | Per Serving | Daily Value % | Health Benefits |
|---|---|---|---|
| Calories | 485 | 24% | Sustained energy release |
| Protein | 32g | 64% | Muscle maintenance, satiety |
| Carbohydrates | 38g | 13% | Quick energy, brain function |
| Fat | 22g | 28% | Essential fatty acids, flavor |
| Fiber | 2.5g | 10% | Digestive health |
| Iron | 3.2mg | 18% | Oxygen transport |
| Potassium | 525mg | 15% | Heart health, muscle function |
Step-by-Step Preparation Method
My approach to this recipe focuses on building layers of flavor while maintaining simplicity. The key is timing and understanding how each component contributes to the final dish.
Phase 1: Foundation Building
• Prep work – I always start by gathering all ingredients and doing my mise en place. This includes dicing the chicken into uniform pieces, mincing aromatics, and measuring liquids.
• Rice preparation – Rinse jasmine rice until water runs clear, then drain thoroughly. This step removes excess starch and prevents the final dish from becoming overly gummy.
• Chicken seasoning – Season chicken pieces generously with salt, pepper, and a touch of garlic powder. Let it rest while preparing other components.
Phase 2: Flavor Development
• Searing the chicken – Heat oil in a heavy-bottomed pot or Dutch oven over medium-high heat. Sear chicken pieces until golden brown on all sides, approximately 6-8 minutes total.
• Aromatics activation – Remove chicken and sauté minced ginger, garlic, and diced onions in the same pot until fragrant, about 2-3 minutes.
• Deglazing – Add a splash of chicken broth to lift any browned bits from the bottom of the pot. These fond particles contribute significant flavor depth.
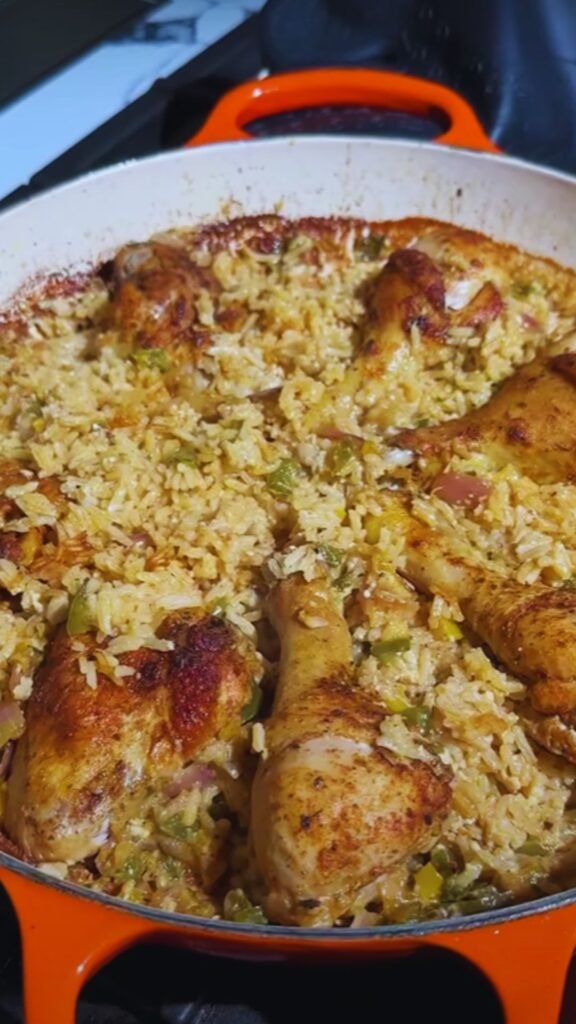
Phase 3: Assembly and Cooking
• Rice integration – Add rinsed rice to the pot, stirring to coat each grain with the aromatic oil mixture. Toast lightly for 2 minutes.
• Liquid addition – Pour in coconut milk, chicken broth, and seasonings. Stir gently to combine all elements uniformly.
• Final assembly – Nestle seared chicken pieces into the rice mixture, ensuring they’re partially submerged but not completely buried.
Advanced Cooking Techniques
The difference between good and exceptional results often lies in the subtle techniques that professional cooks employ. I’ve incorporated several methods that significantly improve the final outcome.
Temperature Control: Maintaining consistent medium-low heat after the initial searing prevents the bottom from burning while ensuring even cooking throughout.
Steam Management: Covering the pot during the simmering phase creates a steam environment that cooks the rice evenly while keeping the chicken moist.
Resting Period: Allowing the dish to rest off heat for 10 minutes before serving lets residual heat finish the cooking process while preventing overcooking.
Flavor Variation Options
One of my favorite aspects of this recipe is its adaptability. I’ve experimented with numerous variations that cater to different taste preferences and dietary requirements.
| Variation Style | Key Modifications | Flavor Profile | Difficulty Level |
|---|---|---|---|
| Thai-Inspired | Lemongrass, lime leaves, Thai basil | Bright, citrusy, herbaceous | Intermediate |
| Indian Fusion | Curry powder, turmeric, cilantro | Warm, spiced, aromatic | Beginner |
| Mediterranean | Olives, sun-dried tomatoes, oregano | Savory, tangy, robust | Intermediate |
| Tropical | Pineapple chunks, bell peppers | Sweet, colorful, fresh | Beginner |
| Spicy Version | Jalapeños, sriracha, red pepper flakes | Hot, bold, intense | Beginner |
Equipment Recommendations
The right equipment makes a significant difference in both the cooking process and final results. Through my experience, I’ve identified essential tools that contribute to success.
Heavy-bottomed Dutch oven – Provides even heat distribution and prevents hot spots that can burn the rice.
Wooden spoon – Gentle stirring tool that won’t scratch non-stick surfaces or break rice grains.
Fine-mesh strainer – Essential for properly rinsing rice and removing excess starch.
Instant-read thermometer – Ensures chicken reaches proper internal temperature of 165°F for food safety.
Troubleshooting Common Issues
Even experienced cooks encounter challenges with this recipe. I’ve compiled solutions to the most frequent problems based on my own cooking experiences and feedback from others who’ve tried this dish.
Problem: Rice turns out mushy Solution: Reduce liquid by 1/4 cup and ensure proper rice rinsing before cooking
Problem: Chicken becomes dry Solution: Use thighs instead of breasts, and don’t overcook – internal temperature should reach exactly 165°F
Problem: Flavors seem flat Solution: Increase aromatics by 50% and add acid (lime juice) at the end of cooking
Problem: Bottom burns while top remains undercooked Solution: Lower heat and ensure pot has thick, heavy bottom for even heat distribution
Storage and Reheating Guidelines
Proper storage extends the life of this dish while maintaining quality and safety. I’ve developed methods that preserve both texture and flavor during storage and reheating.
| Storage Method | Duration | Quality Retention | Reheating Instructions |
|---|---|---|---|
| Refrigerator | 3-4 days | Excellent | Add 2 tbsp liquid, microwave 2-3 minutes |
| Freezer | 2-3 months | Good | Thaw overnight, add liquid, reheat gently |
| Portion Control | Individual containers | Excellent | Single servings reheat more evenly |
Serving Suggestions and Pairings
The complete dining experience involves thoughtful accompaniments that complement rather than compete with the main dish. I’ve discovered several combinations that enhance the overall meal.
Fresh Accompaniments: • Cucumber salad with rice vinegar dressing • Steamed edamame with sea salt • Fresh fruit salad with mint
Vegetable Sides: • Sautéed bok choy with garlic • Roasted asparagus with lemon • Stir-fried green beans
Beverage Pairings: • Jasmine tea or green tea • Coconut water with lime • Fresh fruit smoothies • Sparkling water with citrus
Frequently Asked Questions
Q: Can I use brown rice instead of white jasmine rice? I’ve tried this substitution, and while it works, you need to increase the liquid by about 1/2 cup and extend cooking time by 15-20 minutes. The texture will be chewier and nuttier, which some people prefer.
Q: Is it possible to make this recipe dairy-free? Absolutely! The recipe is naturally dairy-free when you use coconut milk. Just ensure your chicken broth doesn’t contain any dairy products, which some commercial brands include.
Q: How can I make this dish vegetarian? Replace chicken with firm tofu, tempeh, or a combination of mushrooms and chickpeas. Adjust cooking time accordingly since these proteins don’t require the same cooking duration as chicken.
Q: What’s the best way to prevent the rice from sticking to the bottom? Use a heavy-bottomed pot, maintain consistent medium-low heat after the initial searing, and avoid stirring once the liquid is added. Stirring releases starch and can cause sticking.
Q: Can I prepare this dish in advance? You can prep all ingredients ahead of time, but I recommend cooking it fresh for best results. The rice texture changes when reheated, though it’s still delicious.
Q: Why does my coconut milk sometimes curdle? This usually happens when the coconut milk is too cold or if acid is added too quickly. Let coconut milk come to room temperature before adding, and incorporate acidic ingredients gradually.
Q: How do I know when the rice is perfectly cooked? The rice should be tender but still have a slight bite, and most liquid should be absorbed. There might be a small amount of creamy liquid remaining, which is normal and desirable.
This one-pot sticky coconut rice and chicken recipe represents the perfect marriage of convenience and flavor. The technique creates layers of taste that develop throughout the cooking process, while the single-pot approach keeps cleanup minimal. I’ve found that mastering this dish opens doors to countless variations and adaptations, making it a valuable addition to any home cook’s repertoire.
The beauty of this recipe lies in its forgiving nature and incredible versatility. Whether you’re cooking for a weeknight family dinner or entertaining guests, this dish delivers consistent results with impressive presentation. The combination of creamy coconut rice and tender chicken creates a satisfying meal that feels both exotic and comforting, proving that exceptional flavors don’t always require complicated techniques.