Let me tell you about my absolute favorite weeknight dinner discovery – this incredible 30-minute crispy Thai peanut chicken ramen that completely transformed how I think about quick comfort food. I stumbled upon this recipe during one of those hectic weeks when I was craving something both satisfying and exciting, but didn’t have hours to spend in the kitchen.
What makes this dish so special is how it bridges the gap between authentic Thai flavors and the beloved comfort of ramen noodles. The crispy chicken provides that perfect textural contrast against the silky, rich peanut broth, while fresh vegetables add color and crunch. I’ve made this recipe countless times now, tweaking and perfecting it until it became something my family requests weekly.
The beauty of this dish lies in its accessibility – you don’t need any specialty equipment or hard-to-find ingredients. Most items are available at your regular grocery store, and the technique is straightforward enough for beginners while still being satisfying for experienced cooks. I love how this recipe proves that restaurant-quality flavors are absolutely achievable in your own kitchen.
Understanding Thai Peanut Ramen Fundamentals
Ramen Base: Traditional ramen consists of four main components: noodles, broth, tare (seasoning base), and toppings. In this Thai-inspired version, I replace the typical Japanese elements with Southeast Asian flavors.
Peanut Sauce Foundation: The heart of this dish is a rich, creamy peanut sauce that combines natural peanut butter with coconut milk, creating a luxurious base that coats every noodle perfectly.
Crispy Chicken Technique: Instead of traditional chashu pork, I use bite-sized chicken pieces that are coated and fried until golden, providing protein and satisfying crunch.
Fresh Element Balance: Thai cuisine is all about balancing sweet, salty, sour, and spicy elements, which I achieve through careful seasoning and fresh garnishes.
Essential Ingredients Breakdown
The success of this recipe depends on using quality ingredients that work harmoniously together. I’ve learned through trial and error which substitutions work and which ones don’t, so let me share that knowledge with you.
Protein Component
| Ingredient | Quantity | Purpose | Substitution Options |
|---|---|---|---|
| Boneless chicken thighs | 1 lb, cut into bite-sized pieces | Primary protein, stays tender when fried | Chicken breast (though less juicy), firm tofu for vegetarian |
| All-purpose flour | 1/2 cup | Coating for crispiness | Cornstarch for gluten-free option |
| Cornstarch | 2 tablespoons | Adds extra crispiness to coating | Potato starch works well |
| Eggs | 2 large | Binding agent for coating | Buttermilk or plant milk for coating |
Broth and Sauce Base
| Ingredient | Quantity | Purpose | Substitution Options |
|---|---|---|---|
| Natural peanut butter | 1/2 cup | Main flavor base | Almond butter (different flavor profile) |
| Full-fat coconut milk | 1 can (14 oz) | Richness and creaminess | Light coconut milk (less rich) |
| Chicken broth | 3 cups | Liquid base | Vegetable broth for vegetarian |
| Soy sauce | 3 tablespoons | Umami and saltiness | Tamari for gluten-free |
| Rice vinegar | 2 tablespoons | Acidity balance | White vinegar (use less) |
| Sriracha sauce | 1-2 tablespoons | Heat and flavor | Any hot sauce, adjust to taste |
| Fresh ginger | 1 inch piece, minced | Aromatic warmth | Ground ginger (1/2 teaspoon) |
| Garlic | 3 cloves, minced | Flavor foundation | Garlic powder (1 teaspoon) |
Noodles and Vegetables
| Ingredient | Quantity | Purpose | Substitution Options |
|---|---|---|---|
| Fresh ramen noodles | 4 portions | Main carbohydrate | Dried ramen, rice noodles, or spaghetti |
| Red bell pepper | 1 large, sliced | Color and crunch | Any bell pepper color |
| Carrots | 2 medium, julienned | Sweetness and texture | Pre-cut matchstick carrots |
| Snow peas | 1 cup | Fresh crunch | Sugar snap peas or green beans |
| Bean sprouts | 1 cup | Traditional texture | Shredded cabbage |
Step-by-Step Cooking Process
Preparing the Crispy Chicken
I start with the chicken because it takes the longest and needs to stay warm while I prepare everything else. The key to perfectly crispy chicken is getting the oil temperature right and not overcrowding the pan.
First, I cut my chicken thighs into uniform bite-sized pieces, about 1-inch cubes. Thighs work better than breasts because they stay juicier and have more flavor. I season the pieces generously with salt and pepper, then set up my coating station.
In one bowl, I whisk together the flour, cornstarch, salt, pepper, and a pinch of garlic powder. In another bowl, I beat the eggs with a tablespoon of water. The double coating method I use creates incredible crispiness – first the egg wash, then the flour mixture, then back to egg wash, and finally another coating of flour mixture.
I heat about 2 inches of oil in a heavy-bottomed pot to 350°F. Using a thermometer is crucial here because oil that’s too hot will burn the coating before the chicken cooks through, while oil that’s too cool will result in greasy, soggy chicken.
Working in batches to avoid overcrowding, I carefully lower the coated chicken pieces into the hot oil. I fry them for about 4-5 minutes until they’re golden brown and cooked through. The internal temperature should reach 165°F. I transfer the cooked chicken to a wire rack set over paper towels to drain excess oil while staying crispy.
Creating the Peanut Broth
While the chicken rests, I move on to the star of the show – the peanut broth. This is where the magic happens, and getting the consistency right is crucial for the final dish.
I start by heating a large pot over medium heat and adding a tablespoon of oil. I sauté the minced garlic and ginger until fragrant, about 30 seconds. The aroma should be immediate and pronounced – if it’s not, increase the heat slightly.
Next, I whisk in the peanut butter, stirring constantly to prevent burning. This step requires patience because the peanut butter needs to melt and become smooth before adding liquids. I gradually add the coconut milk, whisking continuously to prevent lumps from forming.
Once the coconut milk is fully incorporated, I slowly add the chicken broth, continuing to whisk. The mixture should be smooth and creamy. I bring this to a gentle simmer, then add the soy sauce, rice vinegar, and sriracha. The key is tasting and adjusting – the broth should be rich, slightly sweet, with a good balance of salty and spicy elements.
I let the broth simmer for about 10 minutes to allow the flavors to meld together. If it becomes too thick, I add more broth; if it’s too thin, I let it reduce further.
Preparing Fresh Vegetables
While the broth simmers, I prepare all my fresh vegetables. Proper prep work here makes the final assembly much smoother and ensures everything cooks evenly.
I slice the red bell pepper into thin strips, julienne the carrots into matchstick pieces, and trim the snow peas. The key is keeping all pieces roughly the same size so they cook at the same rate. I also prepare my garnishes – slicing green onions, chopping fresh cilantro, and crushing some peanuts for extra crunch.
Cooking the Noodles
Fresh ramen noodles are my preference because they have the perfect texture and cook quickly, but good quality dried ramen works too. I bring a large pot of water to a boil and cook the noodles according to package directions, usually 2-3 minutes for fresh noodles.
The timing is important here – I want the noodles to finish cooking just as everything else is ready. I drain them thoroughly and divide them among four bowls immediately to prevent them from clumping together.

Quick-Cooking the Vegetables
In the same pot I used for the broth (after removing the broth), I heat a tablespoon of oil over high heat. I add the carrots first since they take longest to cook, stirring constantly for about 1 minute. Then I add the bell peppers and cook for another minute. Finally, I add the snow peas and bean sprouts, cooking just until they’re heated through but still crispy, about 30 seconds.
Assembly and Serving Techniques
The final assembly is where this dish really comes together, and proper technique ensures every bowl is perfect. I’ve learned that the order of assembly matters significantly for both presentation and flavor distribution.
I start by dividing the cooked noodles among four bowls, creating a nest-like shape that will hold the toppings well. I ladle the hot peanut broth over the noodles, making sure to get plenty of the rich, creamy liquid in each bowl.
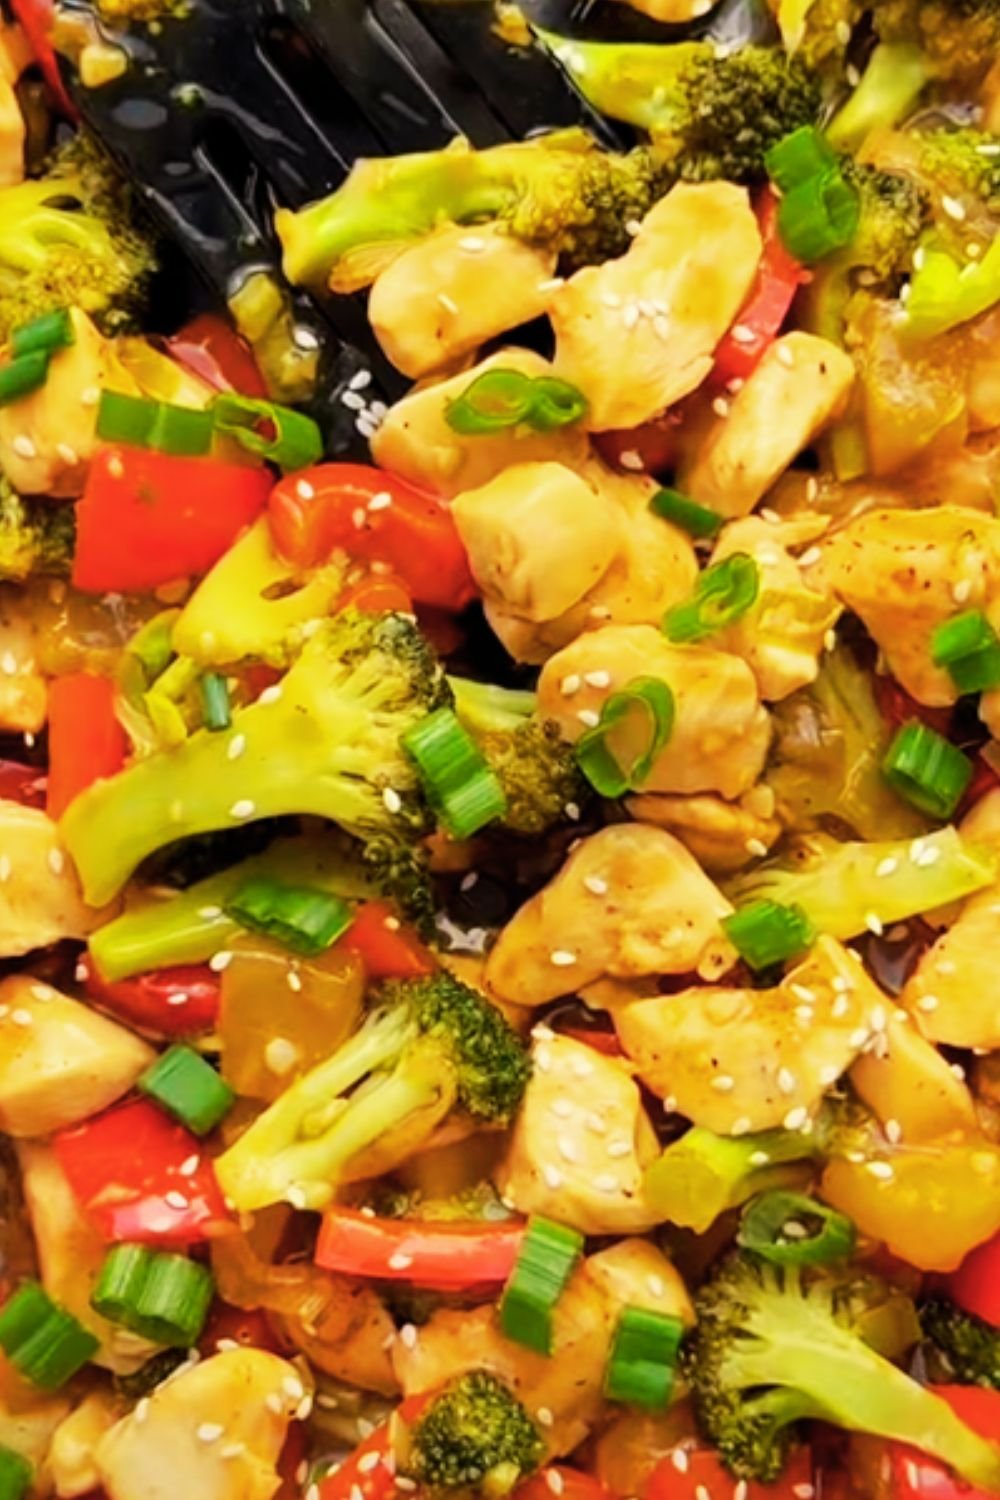
Next, I arrange the quick-cooked vegetables on one side of each bowl, keeping them separate so diners can see the beautiful colors. The crispy chicken goes on the opposite side, and I make sure to include several pieces in each serving.
For garnishes, I sprinkle chopped green onions, fresh cilantro leaves, and crushed peanuts over everything. A lime wedge on the side allows people to add extra acidity to their taste. I also provide extra sriracha for those who want more heat.
Nutritional Information Per Serving
| Nutrient | Amount | % Daily Value |
|---|---|---|
| Calories | 645 | 32% |
| Protein | 28g | 56% |
| Total Fat | 35g | 45% |
| Saturated Fat | 18g | 90% |
| Carbohydrates | 58g | 21% |
| Fiber | 6g | 21% |
| Sugar | 12g | – |
| Sodium | 1,240mg | 54% |
| Potassium | 890mg | 19% |
| Vitamin A | 184% | 184% |
| Vitamin C | 125% | 125% |
| Calcium | 8% | 8% |
| Iron | 15% | 15% |
Customization and Variations
One of the things I love most about this recipe is how adaptable it is to different dietary needs and preferences. Over the months I’ve been making this dish, I’ve developed several variations that work beautifully.
Vegetarian and Vegan Adaptations
For vegetarian versions, I replace the chicken with extra-firm tofu that I press, cube, and fry using the same coating technique. The key is pressing out as much moisture as possible before coating. I also use vegetable broth instead of chicken broth.
For a fully vegan version, I substitute the eggs in the coating with a mixture of plant milk and ground flaxseed, and use vegetable broth throughout. The peanut sauce remains naturally vegan as long as you check that your peanut butter doesn’t contain honey.
Protein Alternatives
I’ve successfully made this recipe with shrimp, which cooks much faster than chicken – about 2 minutes per side. For a different flavor profile, I sometimes use thinly sliced beef or pork, marinated briefly in soy sauce and garlic before coating and frying.
Spice Level Adjustments
The beauty of this recipe is that you can easily adjust the heat level. For mild versions, I omit the sriracha from the broth and serve it on the side. For those who love heat, I add a teaspoon of chili garlic sauce to the broth and include sliced fresh chilies as a garnish.
Seasonal Vegetable Swaps
Depending on what’s available, I often swap out the vegetables. In summer, I love using fresh corn kernels and zucchini. In winter, I might use sliced mushrooms and bok choy. The key is maintaining a good balance of colors and textures.
Time-Saving Tips and Meal Prep Strategies
After making this recipe dozens of times, I’ve developed several strategies to make it even quicker and more convenient for busy weeknights.
Make-Ahead Components
The peanut broth can be made up to three days in advance and stored in the refrigerator. I actually think it tastes better after sitting overnight as the flavors continue to develop. When reheating, I add a splash of broth or coconut milk if it’s become too thick.
I also prep all my vegetables the night before, storing them in separate containers in the refrigerator. The chicken can be coated and stored in the refrigerator for up to 4 hours before frying, which saves significant time on busy evenings.
Batch Cooking Strategies
I often double the recipe for the crispy chicken and freeze half for later use. The cooked chicken reheats beautifully in a 400°F oven for about 5 minutes, regaining most of its crispiness.
The peanut sauce base can also be made in larger batches and frozen in portion-sized containers. I freeze it in ice cube trays, then transfer the frozen cubes to freezer bags. Each cube is roughly equivalent to one serving of sauce base.
Quick Assembly Method
For the fastest possible assembly, I use this order: start the noodle water boiling first, then begin frying the chicken, prepare the vegetables while the chicken cooks, make the broth while the vegetables cook, and finally cook the noodles last. This method gets everything ready in about 25 minutes.
Troubleshooting Common Issues
Through my many attempts at perfecting this recipe, I’ve encountered and solved several common problems that home cooks might face.
Peanut Sauce Problems
If your peanut sauce is too thick, gradually whisk in more warm broth until you reach the desired consistency. If it’s too thin, simmer it uncovered for a few more minutes to reduce, or whisk in an additional tablespoon of peanut butter.
Sometimes the peanut sauce can separate, especially if the temperature changes too quickly. If this happens, remove it from heat and whisk vigorously while slowly adding a tablespoon of warm water. The emulsion should come back together.
Chicken Coating Issues
If your chicken coating isn’t staying crispy, the most common cause is oil temperature that’s too low. Always use a thermometer to ensure your oil is at 350°F. Also, make sure you’re not overcrowding the pan, which drops the oil temperature and leads to soggy coating.
Another issue is moisture in the chicken. Make sure to pat the chicken pieces completely dry before seasoning and coating them.
Noodle Texture Problems
Overcooked noodles are unfortunately common with this recipe because timing is crucial. I recommend slightly undercooking the noodles since they’ll continue to soften slightly when the hot broth is added.
If your noodles are clumping together, make sure to use enough water when cooking them and stir them occasionally. Also, divide them into bowls immediately after draining.
Serving Suggestions and Pairings
This hearty ramen bowl is substantial enough to serve as a complete meal, but I’ve found several accompaniments that enhance the experience beautifully.
Appetizer Pairings
When serving this for dinner parties, I often start with fresh spring rolls filled with crisp vegetables and herbs. The light, fresh flavors provide a nice contrast to the rich, creamy ramen. Thai-style chicken satay skewers also work wonderfully as an appetizer, playing up the Southeast Asian theme.
Side Dish Options
A simple cucumber salad dressed with rice vinegar, a touch of sugar, and red pepper flakes provides a refreshing palate cleanser. I also love serving steamed edamame sprinkled with sea salt – it’s easy to prepare and adds extra protein.
For those who want more vegetables, a quick stir-fry of Asian greens like bok choy or gai lan makes an excellent side dish. I season them simply with garlic, ginger, and a splash of soy sauce.
Beverage Recommendations
I find that this rich, creamy dish pairs beautifully with beverages that can cut through the richness. Fresh iced tea with a squeeze of lime is my go-to choice. Green tea, either hot or cold, also works wonderfully and complements the Asian flavors.
For something more festive, a Thai-style iced coffee or a coconut water-based drink provides interesting flavor complementarity. Sparkling water with fresh fruit also helps cleanse the palate between bites.
Garnish and Condiment Bar
When entertaining, I love setting up a garnish bar so guests can customize their bowls. I include extra lime wedges, sliced jalapeños, additional crushed peanuts, extra cilantro, bean sprouts, and various hot sauces. This interactive element makes the meal more engaging and allows everyone to adjust flavors to their preference.
Storage and Reheating Guidelines
Proper storage techniques ensure you can enjoy leftovers that taste almost as good as the fresh version. I’ve experimented with various storage methods and found the best approaches for each component.
Component Storage
I always store the components separately rather than as assembled bowls. The cooked noodles go in one container, the peanut broth in another, the crispy chicken in a third, and the vegetables in a fourth. This prevents the noodles from absorbing all the broth and becoming mushy.
The peanut broth keeps well in the refrigerator for up to 4 days and can be frozen for up to 3 months. When reheating, I add a splash of fresh broth or coconut milk to restore the proper consistency.
Reheating Techniques
For the best results, I reheat the broth gently on the stovetop, stirring occasionally. The crispy chicken reheats best in a 400°F oven for about 5 minutes, which helps restore some of the crispiness. Microwaving makes it soggy.
Fresh noodles reheat quickly – I usually just pour the hot broth over them and let them warm through. If using leftover noodles, I sometimes give them a quick dip in boiling water before assembling.

Nutritional Benefits and Dietary Considerations
This recipe provides a good balance of macronutrients and several important vitamins and minerals, though it is relatively high in calories and fat due to the coconut milk and peanut butter.
Protein Content
Each serving provides approximately 28 grams of high-quality protein from the chicken, which supports muscle maintenance and provides satiety. The peanut butter adds additional protein along with healthy fats.
Healthy Fats
The coconut milk and peanut butter provide healthy fats that are important for nutrient absorption and hormone production. While the saturated fat content is relatively high, these are naturally occurring fats from whole food sources.
Vegetable Nutrients
The variety of colorful vegetables provides important vitamins and minerals. Bell peppers are high in vitamin C, carrots provide beta-carotene, and the leafy garnishes add folate and other B vitamins.
Sodium Considerations
This recipe is relatively high in sodium, primarily from the soy sauce and chicken broth. For those watching sodium intake, I recommend using low-sodium versions of these ingredients and adjusting seasoning to taste.
Questions and Answers
Q: Can I make this recipe without coconut milk?
I’ve tried several alternatives to coconut milk, and while the flavor changes significantly, it’s definitely possible. Heavy cream creates a rich broth but lacks the subtle sweetness of coconut. Cashew cream made from soaked cashews and water provides a neutral, creamy base that works well. You could also use whole milk, though the result will be much lighter in flavor and texture.
Q: How can I make the chicken extra crispy?
The secret to maximum crispiness lies in the double-coating technique I described, but there are a few extra steps that help. First, let the coated chicken rest for 10 minutes before frying – this helps the coating adhere better. Second, make sure your oil temperature is exactly 350°F. Third, don’t overcrowd the pan, which drops the oil temperature. Finally, after frying, place the chicken on a wire rack rather than paper towels to prevent steam from making the bottom soggy.
Q: What’s the best way to adjust the spice level?
The beauty of this recipe is that you can easily customize the heat. For a milder version, omit the sriracha from the broth entirely and serve it on the side. For more heat, I add a teaspoon of chili garlic sauce or a minced fresh chili to the broth. You can also garnish with sliced jalapeños or serve with additional hot sauce on the side.
Q: Can I use a different type of noodle?
Absolutely! While fresh ramen noodles are my preference, I’ve successfully used dried ramen noodles, rice noodles, and even spaghetti in a pinch. Rice noodles create a different texture but work particularly well if you’re avoiding gluten. The key is adjusting the cooking time according to the package directions and not overcooking them since they’ll soften slightly when the hot broth is added.
Q: How do I prevent the peanut sauce from separating?
Separation usually happens when the temperature changes too quickly or when the sauce gets too hot. To prevent this, add liquids gradually while whisking constantly, and keep the heat at medium or lower. If it does separate, remove it from heat immediately and whisk vigorously while slowly adding a tablespoon of warm water. The emulsion should come back together.
Q: Can I make this recipe dairy-free?
This recipe is naturally dairy-free as long as you use coconut milk and check that your other ingredients don’t contain hidden dairy. The crispy chicken coating uses eggs rather than dairy, and the peanut sauce base is completely plant-based. Just double-check labels on things like chicken broth and any condiments you use.
Q: How long does the leftover broth keep?
The peanut broth keeps well in the refrigerator for up to 4 days and can be frozen for up to 3 months. When reheating, you may need to whisk in a bit of additional broth or coconut milk to restore the proper consistency, as it tends to thicken when cold. I always taste and adjust seasoning after reheating since flavors can meld and change over time.
Q: What vegetables work best as substitutions?
I’ve experimented with many different vegetables in this recipe. Mushrooms add great umami flavor and meaty texture. Bok choy or baby spinach wilt nicely in the hot broth. Corn kernels add sweetness that complements the peanut sauce. Broccoli florets work well if you blanch them first. The key is maintaining a balance of colors and textures while choosing vegetables that won’t overpower the peanut flavor.
Q: Can I prepare this recipe for a crowd?
This recipe scales up beautifully for larger groups. I’ve successfully made it for up to 12 people by tripling the recipe. The key is having large enough pots and working in batches for the crispy chicken. I recommend setting up a garnish bar so guests can customize their bowls, and keeping the broth warm in a slow cooker on low heat. Prepare all components ahead of time and assemble individual bowls as needed.
Q: What’s the secret to getting restaurant-quality flavor at home?
The key is balancing all the flavor elements – sweet, salty, sour, and spicy. I always taste the broth and adjust seasoning before serving. Using high-quality peanut butter makes a huge difference, as does not skimping on the aromatics like fresh ginger and garlic. The contrast between the hot, creamy broth and the cold, fresh garnishes is also crucial for that restaurant-style experience.
This 30-minute crispy Thai peanut chicken ramen has become one of my most requested recipes, and I hope it brings as much joy to your kitchen as it has to mine. The combination of rich, creamy broth, perfectly crispy chicken, and fresh vegetables creates a bowl that’s both comforting and exciting. Whether you’re cooking for a busy weeknight dinner or entertaining friends, this recipe delivers restaurant-quality results with ingredients you can find at any grocery store.