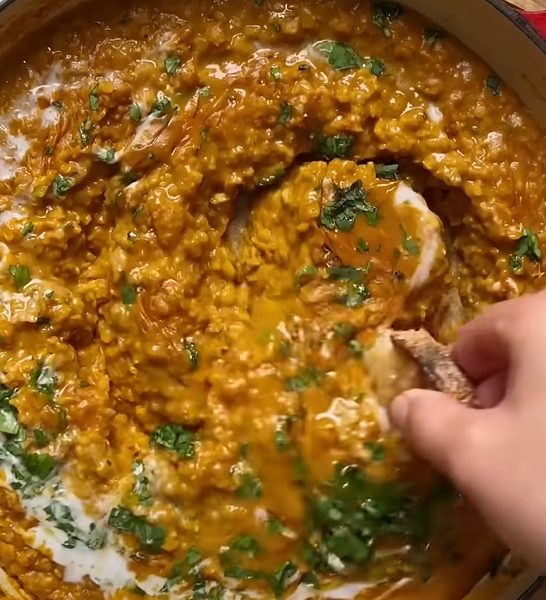
There’s something magical about the moment when coconut milk meets aromatic spices in a hot pan. The gentle sizzle, the fragrant steam rising up, and that unmistakable aroma that tells you something incredible is about to happen. That’s exactly what you’ll experience when making this vibrant coconut chickpea curry that has become my absolute go-to weeknight dinner.
I’ve been perfecting this recipe for years, tweaking spice levels and adjusting cooking times until I arrived at something truly special. What started as a simple attempt to use up a can of chickpeas has evolved into one of my most requested recipes. The beauty lies not just in its incredible flavor, but in how quickly it comes together – just 30 minutes from start to finish.
This isn’t your average curry. While many recipes rely heavily on complex spice blends or hard-to-find ingredients, mine focuses on building layers of flavor with accessible pantry staples. The result is a curry that’s both authentically inspired and completely approachable for home cooks of any skill level.
Why This Coconut Chickpea Curry Works
The secret to exceptional curry lies in understanding how flavors develop and marry together. I’ve discovered that the key is creating what I call “flavor foundations” – distinct layers that build upon each other to create complexity without overwhelming your palate.
Base Layer: My curry starts with a trinity of onions, garlic, and ginger. These aromatics form the foundation, providing depth and warmth that permeates every spoonful.
Spice Layer: Rather than dumping all spices in at once, I toast them briefly in oil. This awakening process releases essential oils and creates a more nuanced flavor profile.
Liquid Layer: The coconut milk provides richness while tomatoes add acidity that balances the creaminess perfectly.
Protein Layer: Chickpeas aren’t just filler here – they’re the star, absorbing all those beautiful flavors while providing satisfying texture and plant-based protein.
What makes this curry particularly special is its versatility. I’ve served it to carnivorous friends who didn’t miss meat for a second, and to picky eaters who typically avoid anything remotely spicy. The coconut milk provides a cooling effect that tames the heat while allowing the spices to shine.
Essential Ingredients Breakdown
Understanding your ingredients transforms good cooking into great cooking. Here’s what each component brings to our curry masterpiece:
Coconut Milk: I always use full-fat canned coconut milk. The richness is non-negotiable – it’s what makes this curry luxuriously creamy. Light coconut milk simply won’t deliver the same depth of flavor or satisfying mouthfeel.
Chickpeas: Whether you use canned or cook them from scratch, chickpeas provide the perfect canvas for our spice blend. Their mild, nutty flavor absorbs seasonings beautifully while maintaining a satisfying bite.
Aromatics: Yellow onions provide sweetness when sautéed, while fresh garlic and ginger add pungency and warmth. I never substitute dried versions here – fresh makes all the difference.
Tomatoes: Canned diced tomatoes work perfectly, providing acidity that prevents the curry from becoming too heavy. They also add a subtle sweetness that complements the coconut milk.
Spices: My blend includes cumin, coriander, turmeric, and garam masala. Each serves a specific purpose in building our flavor profile.
The 30-Minute Method
Time management in the kitchen is everything. Here’s how I streamline this curry to fit into busy weeknight schedules:
Preparation Phase (5 minutes): While many recipes suggest extensive prep work, I’ve found that minimal preparation actually works better. Dice your onion, mince garlic and ginger, and open your cans. That’s it.
Building Flavor (8 minutes): Heat oil in a large skillet or pot. Sauté onions until translucent, then add garlic and ginger. The key here is not rushing – let each ingredient cook properly before adding the next.
Spice Activation (2 minutes): Add your spice blend and cook until fragrant. This step is crucial – undercooked spices taste harsh and bitter, while perfectly toasted spices release their essential oils and become aromatic.
Liquid Integration (5 minutes): Add tomatoes first, cooking until they break down slightly. Then pour in coconut milk and bring to a gentle simmer.
Final Assembly (10 minutes): Add chickpeas and let everything simmer together. This allows flavors to meld while the chickpeas warm through completely.
Detailed Recipe Instructions
Ingredients
Base Ingredients:
- 2 tablespoons coconut oil (or vegetable oil)
- 1 large yellow onion, diced
- 4 cloves garlic, minced
- 2 inches fresh ginger, minced
- 1 can (14 oz) full-fat coconut milk
- 1 can (14.5 oz) diced tomatoes
- 2 cans (15 oz each) chickpeas, drained and rinsed
Spice Blend:
- 2 teaspoons ground cumin
- 2 teaspoons ground coriander
- 1 teaspoon turmeric
- 1 teaspoon garam masala
- 1/2 teaspoon cayenne pepper (adjust to taste)
- 1 teaspoon salt (or to taste)
Finishing Touches:
- 2 tablespoons fresh lime juice
- 1/4 cup fresh cilantro, chopped
- Black pepper to taste
Method
Heat coconut oil in a large skillet or Dutch oven over medium heat. Add diced onion and cook for 5-6 minutes until softened and translucent. The onions should be golden but not browned.
Add minced garlic and ginger to the pan. Cook for 1-2 minutes, stirring constantly to prevent burning. You’ll know it’s ready when the mixture becomes fragrant and the raw garlic smell disappears.
Add all spices to the pan: cumin, coriander, turmeric, garam masala, cayenne, and salt. Stir constantly for 30-60 seconds until the spices become aromatic. Be careful not to burn them – if the heat is too high, reduce it slightly.
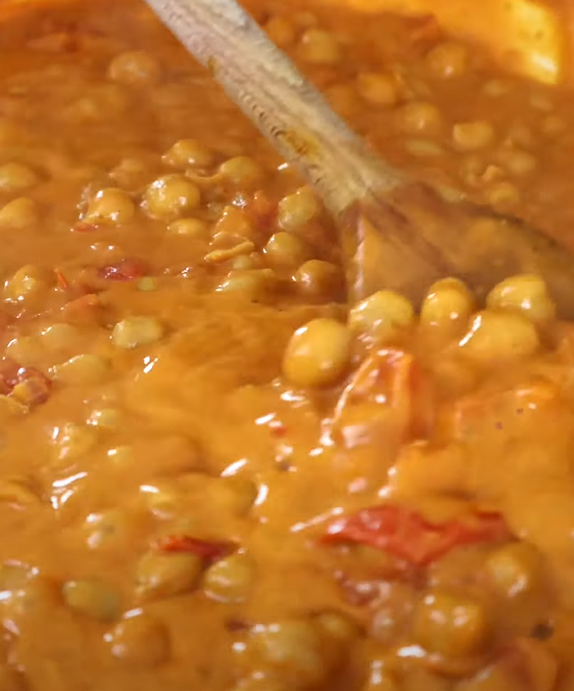
Pour in the diced tomatoes with their juice. Let them cook for 3-4 minutes, stirring occasionally, until they start to break down and the mixture becomes paste-like.
Slowly pour in the coconut milk, stirring to combine with the tomato-spice mixture. Bring to a gentle simmer – avoid boiling vigorously as this can cause the coconut milk to separate.
Add the drained chickpeas to the curry. Stir gently to coat them with the sauce. Let everything simmer for 8-10 minutes, stirring occasionally, until the flavors meld together and the curry reaches your desired consistency.
Remove from heat and stir in fresh lime juice and chopped cilantro. Taste and adjust seasoning with additional salt, pepper, or lime juice as needed.
Nutritional Benefits and Health Information
This curry isn’t just delicious – it’s incredibly nutritious. As someone who’s always looking for ways to pack more plant-based nutrition into my meals, this recipe delivers on multiple fronts.
| Nutrient | Per Serving | Daily Value % | Health Benefits |
|---|---|---|---|
| Protein | 12g | 24% | Complete amino acid profile from chickpeas |
| Fiber | 8g | 32% | Supports digestive health and satiety |
| Iron | 4.2mg | 23% | Essential for oxygen transport |
| Folate | 180mcg | 45% | Important for cell division and DNA synthesis |
| Magnesium | 95mg | 23% | Supports muscle and nerve function |
| Potassium | 580mg | 12% | Helps regulate blood pressure |
| Vitamin C | 15mg | 17% | Immune system support from tomatoes |
| Healthy Fats | 14g | – | Medium-chain fatty acids from coconut |
Antioxidant Profile: The spices in this curry are nutritional powerhouses. Turmeric contains curcumin, a powerful anti-inflammatory compound. Cumin and coriander provide antioxidants that support cellular health. Ginger offers digestive benefits and has been shown to have anti-nausea properties.
Plant-Based Protein: Chickpeas provide all essential amino acids, making this curry a complete protein source. This is particularly important for those following plant-based diets.
Heart-Healthy Fats: While coconut milk is high in saturated fat, it contains lauric acid, which may have different metabolic effects than other saturated fats. The key is moderation and balance within your overall diet.
Customization and Variations
One reason I love this recipe is its adaptability. Over the years, I’ve experimented with countless variations, each bringing something unique to the table.
Vegetable Additions:
- Sweet potatoes (add with tomatoes for longer cooking time)
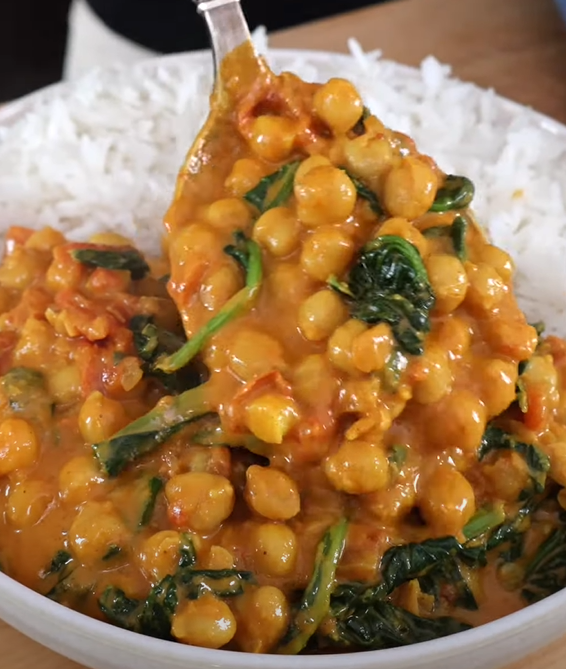
- Spinach (stir in during last 2 minutes)
- Bell peppers (add with onions)
- Cauliflower (add with chickpeas)
- Green beans (add 5 minutes before chickpeas)
Protein Alternatives:
- Substitute chickpeas with black beans or kidney beans
- Add cubed firm tofu for extra protein
- Include cooked lentils for a heartier texture
Spice Level Adjustments:
- Mild: Reduce cayenne to 1/4 teaspoon
- Medium: Use recipe as written
- Hot: Add 1/2 teaspoon crushed red pepper flakes
- Very Hot: Include 1-2 minced jalapeños with the garlic
Regional Variations:
- Thai-inspired: Add lemongrass and Thai basil
- Indian-style: Include cardamom pods and cinnamon stick
- Mexican fusion: Add cumin and smoked paprika
- Mediterranean twist: Include oregano and sun-dried tomatoes
Serving Suggestions and Pairings
The beauty of this curry lies in its versatility. I’ve served it countless ways, and each presentation brings out different aspects of its flavor profile.
Traditional Pairings:
- Basmati rice (the classic choice)
- Brown rice for added nutrition
- Quinoa for extra protein
- Naan bread or whole wheat flatbread
Creative Serving Ideas:
- Over cauliflower rice for low-carb option
- With roasted sweet potato wedges
- Alongside cucumber raita for cooling contrast
- Over pasta for fusion comfort food
- With warm pita bread for Mediterranean flair
Garnish Options:
- Fresh cilantro (essential in my opinion)
- Lime wedges for individual seasoning
- Sliced red chilies for heat lovers
- Toasted coconut flakes for texture
- Fresh mint leaves for aromatic contrast
- Pickled red onions for acidity
Complete Meal Planning: When I serve this curry for dinner parties, I like to create a complete experience. Start with a light salad dressed with lemon vinaigrette, serve the curry with basmati rice and warm naan, and finish with mango sorbet or coconut rice pudding for dessert.
Storage and Meal Prep Guidelines
This curry is a meal prep champion. I often make double batches because it stores beautifully and actually improves in flavor over time.
Refrigerator Storage: Store in airtight containers for up to 5 days. The flavors continue to develop, making day-two curry often better than day-one.
Freezer Storage: Freeze in portion-sized containers for up to 3 months. I like using glass containers with tight-fitting lids to prevent freezer burn.
Reheating Instructions:
- From refrigerated: Heat gently in a saucepan over medium-low heat, stirring occasionally
- From frozen: Thaw overnight in refrigerator, then reheat as above
- Microwave option: Heat in 30-second intervals, stirring between each
Meal Prep Tips:
- Cook rice separately and store in divided containers
- Prepare fresh garnishes just before serving
- Consider freezing in individual portions for quick weeknight meals
Troubleshooting Common Issues
Even experienced cooks encounter challenges. Here are solutions to the most common problems I’ve encountered with this recipe:
Curry Too Thin: Simmer uncovered for additional 5-10 minutes to reduce liquid. Alternatively, mix 1 tablespoon cornstarch with 2 tablespoons cold water and stir into curry.
Curry Too Thick: Add additional coconut milk or vegetable broth, 1/4 cup at a time, until desired consistency is reached.
Coconut Milk Separated: This often happens with high heat. Reduce temperature and whisk vigorously to re-emulsify. Prevention is key – keep heat at medium or lower.
Spices Taste Raw: This indicates insufficient toasting. Next time, cook spices longer in the oil before adding liquids.
Lack of Flavor Depth: Often caused by rushing the aromatics. Ensure onions are properly sautéed and spices are well-toasted.
Too Spicy: Add more coconut milk or a touch of coconut sugar to balance heat. Fresh lime juice also helps cool spicy flavors.
Not Spicy Enough: Add cayenne pepper gradually, tasting as you go. Fresh chilies added with garlic provide more complex heat than dried spices added later.
Advanced Techniques and Tips
After making this curry hundreds of times, I’ve developed several techniques that elevate it from good to exceptional:
Spice Grinding: When possible, I grind whole spices myself. Toast whole cumin and coriander seeds in a dry pan for 2-3 minutes, then grind in a spice grinder. The difference in flavor is remarkable.
Coconut Milk Selection: Not all coconut milk is created equal. I prefer brands with minimal ingredients (coconut, water, maybe guar gum). Avoid those with extensive stabilizer lists.
Temperature Control: Maintaining proper temperature throughout cooking is crucial. Too high heat can cause coconut milk to separate and spices to burn. Medium heat is your friend.
Layered Seasoning: I season at multiple stages – salt with the onions to help them cook evenly, again with the spices, and finally to taste at the end.
Resting Time: Like many stews and curries, this benefits from resting. If time permits, let it sit for 15-20 minutes after cooking before serving.
Questions and Answers
Q: Can I make this curry ahead of time? Absolutely! This curry actually improves in flavor when made ahead. I often prepare it the day before serving, which allows all the spices to meld beautifully. Store it in the refrigerator and gently reheat before serving. The flavors will be even more developed and delicious.
Q: What’s the best substitute for coconut milk if I have allergies? For coconut allergies, I recommend using cashew cream (blend 1 cup soaked cashews with 1 cup water) or full-fat oat milk. While the flavor profile will change slightly, you’ll still get a creamy, satisfying curry. Some people also use heavy cream, though this obviously isn’t vegan.
Q: Can I use dried chickpeas instead of canned? Definitely! Use 1 cup dried chickpeas, soaked overnight and cooked until tender. This typically takes 45-60 minutes of cooking time. The advantage is better texture and no added sodium. Cook them separately, then add to the curry as you would canned chickpeas.
Q: How can I make this curry lower in fat? You can use light coconut milk instead of full-fat, though you’ll sacrifice some richness. Another option is to use half coconut milk and half vegetable broth. I’ve also successfully used coconut milk powder mixed with water for a lighter version.
Q: What’s the difference between garam masala brands, and does it matter? Garam masala blends vary significantly between brands and regions. Some are sweeter with more cinnamon and cardamom, others are more peppery. I prefer brands with visible whole spice pieces rather than fine powder. If you can’t find garam masala, make your own with equal parts cinnamon, cardamom, cloves, and black pepper.
Q: Can I double or triple this recipe for meal prep? This recipe scales beautifully! I regularly make triple batches for meal prep. Use a large Dutch oven or split between two pans if needed. Cooking times remain the same, but you may need to simmer a bit longer to achieve the right consistency with larger volumes.
Q: How spicy is this curry, and how can I adjust the heat level? As written, this curry has a mild to medium heat level. The cayenne provides warmth without overwhelming spiciness. To reduce heat, omit cayenne entirely or use just a pinch. To increase heat, add fresh jalapeños with the garlic, or include red pepper flakes with the spices.
Q: What should I do if my curry tastes bland? Bland curry usually means insufficient salt or under-toasted spices. Add salt gradually, tasting as you go – you might need more than you think. Also, ensure you’re toasting the spices properly until fragrant. A splash of lime juice at the end brightens all the flavors significantly.
Q: Can I freeze this curry, and how long will it keep? This curry freezes excellently for up to 3 months. I freeze it in individual portions in glass containers, leaving space for expansion. Thaw overnight in the refrigerator before reheating. The texture might be slightly different after freezing, but the flavor remains delicious.
Q: Are there any ingredients I can prep in advance? Yes! You can dice onions and store them covered in the refrigerator for up to 3 days. Garlic and ginger can be minced and stored together in the refrigerator for 2-3 days. I often prep these aromatics on Sunday for quick weeknight cooking. You can also pre-mix your spice blend and store it in an airtight container.
This coconut chickpea curry has become more than just a recipe in my kitchen – it’s a reliable friend that never fails to satisfy. Whether you’re cooking for one or feeding a crowd, seeking comfort food or trying to impress guests, this curry delivers every single time. The combination of accessibility, nutrition, and incredible flavor makes it a recipe I’m proud to share and one I know you’ll return to again and again.
The beauty of home cooking lies in making recipes your own, and I encourage you to experiment with this foundation. Try different vegetables, adjust spice levels to your preference, and discover your own perfect version. After all, the best recipes are the ones that become part of your personal cooking story.