
Have you ever tasted a Thai dish and wondered what gives it that perfect balance of sweet, salty, and spicy flavors? The secret often lies in a magical concoction called Nam Prik Pao, or Thai chili paste. I’ve been obsessed with Thai cuisine for years, and learning to make this versatile paste at home has been a game-changer for my cooking.
Today, I’m sharing my foolproof recipe for easy Thai chili paste that rivals anything you’ll find in a store. Trust me when I say this homemade version will transform your Thai cooking forever!
What is Thai Chili Paste?
Nam Prik Pao (น้ำพริกเผา) is the heart and soul of many Thai dishes. This complex condiment delivers an incredible depth of flavor through its perfect balance of spicy, sweet, salty, and umami notes. Unlike fresh chili pastes, Nam Prik Pao is cooked, giving it a rich, roasted flavor profile and a longer shelf life.
In Thailand, this paste is so beloved that it’s often called “Thai chili jam” or “roasted chili paste.” It’s used as a cooking ingredient, condiment, dipping sauce, and even enjoyed straight with rice during tough economic times. That’s how flavorful it is!
Why Make Thai Chili Paste at Home?
After years of buying store-bought versions, I finally tried making my own, and I’ve never looked back. Here’s why you should consider making yours at home too:
- Customizable heat level: Adjust the spiciness to your preference
- No preservatives or additives: Just clean, wholesome ingredients
- Superior flavor: The depth and freshness is unmatched by commercial versions
- Cost-effective: Make larger batches for less than premium store-bought options
- Impressive culinary skill: Impress friends and family with your authentic Thai cooking
Essential Ingredients
The magic of Thai chili paste comes from its carefully balanced ingredients. Here’s what you’ll need:
| Ingredient | Amount | Notes |
|---|---|---|
| Dried red chilies | 20-25 (about 2 oz) | Thai chilies preferred; adjust for heat preference |
| Shallots | 8 medium (about 7 oz) | Provides sweetness and body |
| Garlic | 10 cloves (about 1.5 oz) | Fresh only, not pre-minced |
| Tamarind paste | 2 tablespoons | Authentic tamarind, not concentrate if possible |
| Palm sugar | 3 tablespoons | Can substitute brown sugar but flavor will differ |
| Fish sauce | 3 tablespoons | High-quality brand for best results |
| Shrimp paste (Kapi) | 2 teaspoons | Critical for authentic flavor |
| Dried shrimp | 2 tablespoons | Adds umami depth |
| Vegetable oil | 1/2 cup | For frying and preservation |
| Salt | 1 teaspoon | Fine sea salt preferred |
Ingredient Notes:
Dried chilies: The variety you choose significantly impacts the flavor and heat level. For an authentic taste, use Thai dried chilies (prik haeng), but you can substitute with dried Mexican chilies like guajillo or chile de árbol in a pinch.
Shrimp paste: This fermented ingredient (kapi in Thai) gives the paste its distinctive umami foundation. If you’re making a vegetarian version, miso paste can work as a substitute, though the flavor profile will change.
Tamarind: Provides the essential sour note that balances the sweet and spicy elements. Fresh tamarind pulp is ideal, but tamarind paste works well too.
Palm sugar: This traditional sweetener has caramel notes that can’t be perfectly replicated. If unavailable, brown sugar or coconut sugar can substitute.
Equipment You’ll Need
Before getting started, gather these kitchen tools:
- Heavy-bottomed skillet or wok
- Food processor or mortar and pestle
- Baking sheet
- Spatula
- Air-tight storage jars
- Kitchen gloves (optional but recommended for handling chilies)
Step-by-Step Instructions
1. Prepare the Dried Chilies
First, we need to prepare the dried chilies properly:
- Cut the stems off the dried chilies
- Shake out and discard most seeds (keep some for heat)
- Soak in warm water for 20-25 minutes until soft
- Drain well and pat dry with paper towels
Pro tip: The seeds contain most of the heat. Keep more for a spicier paste, remove all for a milder version.
2. Toast the Aromatics
This crucial step develops the deep, complex flavors that make Thai chili paste special:
- Peel the shallots and garlic cloves
- Heat a dry skillet over medium heat
- Place shallots and garlic in the skillet
- Cook, turning occasionally, until charred and softened (about 8-10 minutes)
- Remove and let cool
Alternative method: You can also roast them in an oven at 375°F (190°C) for about 15-20 minutes until soft and slightly blackened.
3. Toast the Dried Shrimp
- In the same dry skillet, add the dried shrimp
- Toast over medium heat for 3-4 minutes until fragrant and lightly browned
- Remove and let cool
4. Cook the Shrimp Paste
- Wrap the shrimp paste in a small piece of aluminum foil
- Toast in the dry skillet for 3-4 minutes, flipping once
- The paste should become fragrant but not burnt
- Let cool before unwrapping
5. Process the Base Ingredients
- Add the soaked chilies, toasted shallots, garlic, and dried shrimp to a food processor
- Pulse until you achieve a coarse paste
- If using a mortar and pestle, work in batches, grinding each ingredient before combining
Texture note: Traditional Thai chili paste has some texture – it shouldn’t be completely smooth.
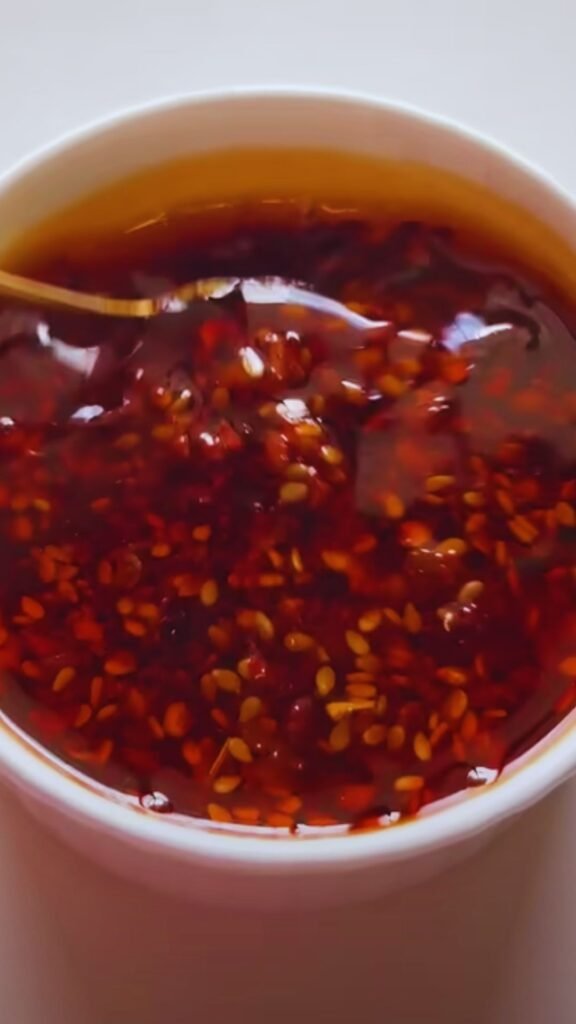
6. Cook the Paste
This step transforms the raw ingredients into the complex, harmonious paste we’re aiming for:
- Heat the vegetable oil in a wok or heavy-bottomed pan over medium-low heat
- Add the processed paste mixture
- Cook, stirring constantly, for about 8-10 minutes until fragrant and the oil begins to separate
- The paste will darken as it cooks – this is good! It should become a deep reddish-brown
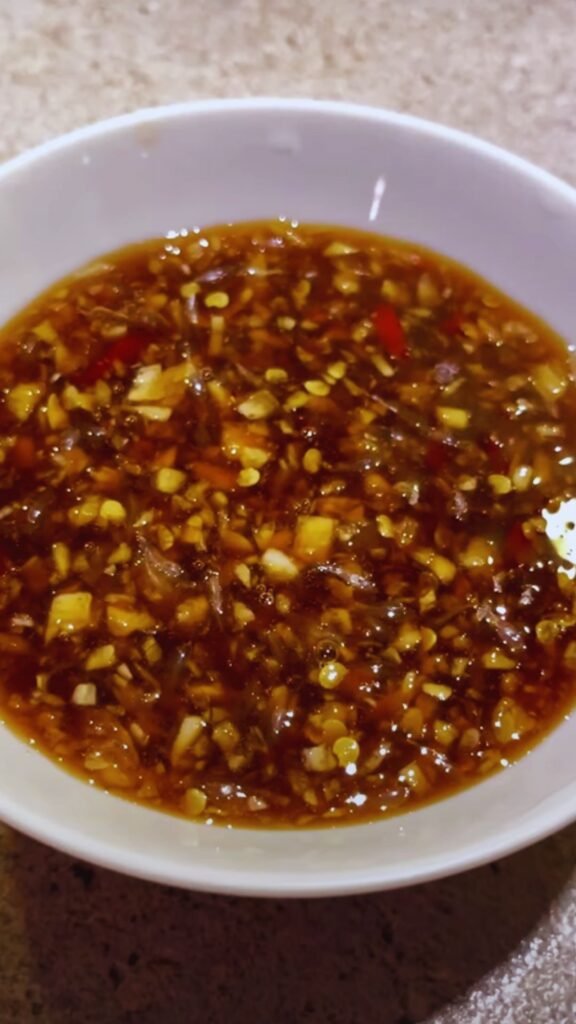
7. Add the Seasonings
- Add the unwrapped shrimp paste and stir to incorporate
- Add palm sugar and stir until dissolved
- Add fish sauce, tamarind paste, and salt
- Continue cooking for another 5-7 minutes, stirring frequently
- The mixture should become thick, fragrant, and slightly glossy
8. Test and Adjust
- Take a small amount and cool it to taste
- Adjust seasoning as needed:
- For more sweetness: add palm sugar
- For more saltiness: add fish sauce
- For more sourness: add tamarind
- For more heat: add ground dried chili
9. Cool and Store
- Allow the paste to cool completely
- Transfer to clean, sterilized jars
- Pour a thin layer of oil on top to seal (this helps preservation)
- Store in the refrigerator
Storage and Shelf Life
Properly stored Thai chili paste is remarkably long-lasting:
- Refrigerated: Will keep for 2-3 months
- Frozen: Can last up to 6 months
- Signs of spoilage: Mold, off smells, or unusual discoloration
For longer storage, I recommend portioning the paste into ice cube trays, freezing, then transferring the cubes to freezer bags. This way, you can easily grab just what you need.
Variations and Customizations
Vegetarian/Vegan Version
To make a plant-based version:
- Replace shrimp paste with miso paste or fermented soybean paste
- Replace fish sauce with soy sauce or tamari
- Omit dried shrimp, or replace with extra firm toasted tofu that has been crumbled and dried
- Add 1 teaspoon of mushroom powder for umami depth
Adjusting Heat Levels
- Mild: Remove all seeds from chilies and use fewer chilies
- Medium: Use the recipe as written
- Hot: Keep seeds in all chilies and increase quantity by 25%
- Extra Hot: Add 1-2 fresh Thai bird’s eye chilies to the mix
Regional Variations
Thai chili paste varies by region:
- Northern Style: Includes more garlic and sometimes ginger
- Southern Style: Often hotter with more chilies
- Central Thai: The most balanced and what this recipe follows
Common Mistakes to Avoid
In my years of making Thai chili paste, I’ve made plenty of mistakes. Here’s what to watch out for:
- Not toasting ingredients properly: This develops essential flavors
- Processing too fine: Traditional Nam Prik Pao has some texture
- Rushing the cooking process: Low and slow cooking develops complex flavors
- Using low-quality fish sauce: The quality dramatically affects the end result
- Forgetting to taste and adjust: Personal preference matters!
How to Use Thai Chili Paste
The beauty of having homemade Thai chili paste on hand is its incredible versatility:
As a Cooking Ingredient
- Tom Yum Soup: Add 1-2 tablespoons to create an instant flavor base
- Pad Thai: Mix with noodles for authentic flavor
- Stir-fries: Add a tablespoon to any vegetable or meat stir-fry
- Fried Rice: A teaspoon transforms ordinary fried rice
- Marinades: Mix with a little lime juice for an incredible meat or tofu marinade
As a Condiment
- Dipping sauce: Mix with lime juice for grilled meats or fresh spring rolls
- Spread: Try it on toast with avocado for a spicy breakfast
- Mix-in: Stir into mayonnaise or yogurt for a flavorful spread
- Noodle topping: Add a dollop to noodle soups just before serving
My Favorite Quick Recipe: 15-Minute Thai Chili Paste Noodles
When I’m short on time but craving big flavor, this is my go-to recipe:
- Cook 8 oz of rice noodles according to package directions
- In a wok, heat 1 tablespoon of oil
- Add 2 tablespoons of Thai chili paste and stir until fragrant
- Add any protein of choice (tofu, chicken, shrimp)
- Toss in the drained noodles
- Add a splash of lime juice and some chopped cilantro
- Serve immediately
Serving Suggestions
Thai chili paste elevates nearly any dish. Here are some of my favorite pairings:
- Jasmine rice with a fried egg and a spoonful of chili paste
- Grilled fish with a side of chili paste mixed with lime
- Fresh vegetables for dipping
- Congee or rice porridge with a small dollop stirred in
- Cold soba noodles with chili paste dressing
Nutritional Benefits
Beyond its incredible flavor, Thai chili paste offers several health benefits:
| Nutrient/Component | Benefit |
|---|---|
| Capsaicin (from chilies) | May boost metabolism and reduce inflammation |
| Allicin (from garlic) | Has antimicrobial properties |
| Shallots | Rich in antioxidants and prebiotics |
| Fermented components | Support gut health |
| Spices | Contain various antioxidants |
Of course, the paste is relatively high in sodium and should be consumed in moderation as part of a balanced diet.
Troubleshooting Common Issues
My paste is too watery
Solution: Continue cooking on low heat, stirring frequently until more moisture evaporates.
My paste burned
Solution: Next time, keep heat lower and stir more frequently. For the current batch, if not too burnt, add more fresh ingredients to dilute the burnt flavor.
My paste is too spicy
Solution: Add more palm sugar and tamarind to balance the heat. You can also stir in a little coconut milk when using the paste.
My paste doesn’t taste complex enough
Solution: Make sure you’re properly toasting all ingredients. Consider adding a wider variety of chilies or a pinch of five-spice powder.
Questions and Answers
Q: Can I make Thai chili paste without shrimp paste?
A: Yes, you can! While traditional Nam Prik Pao uses shrimp paste for its umami foundation, you can substitute with miso paste for a vegetarian version. The flavor will be different but still delicious.
Q: How long does homemade Thai chili paste last?
A: When stored properly in the refrigerator with a layer of oil on top, it can last 2-3 months. Freezing extends shelf life to 6 months.
Q: Is Thai chili paste the same as sriracha or gochujang?
A: No, they’re quite different. Sriracha is a fresh chili sauce, while gochujang is a Korean fermented chili paste with different ingredients and flavor profile. Thai chili paste (Nam Prik Pao) is a cooked paste with a complex sweet-salty-spicy flavor.
Q: Can I reduce the oil in this recipe?
A: The oil serves as both a cooking medium and a preservative. You can reduce it somewhat, but eliminating it entirely will affect both flavor development and shelf life.
Q: My family doesn’t like spicy food. Can I still make this?
A: Absolutely! Remove all seeds from the dried chilies and reduce the quantity by half. The result will be a flavorful paste with minimal heat that still delivers the complex flavor profile Thai cuisine is known for.
Q: Can I use a blender instead of a food processor?
A: Yes, but you’ll need to add a little liquid (perhaps some of the oil from the recipe) to help it blend. Work in pulses rather than continuous blending to maintain some texture.
Q: What can I substitute for tamarind paste?
A: In a pinch, you can use a mixture of lime juice and a touch of brown sugar, though the flavor won’t be exactly the same. Some cooks also use a splash of rice vinegar with a bit of tomato paste.
Final Thoughts
Making Thai chili paste at home has been one of the most rewarding cooking skills I’ve developed. Not only does it provide an authentic foundation for countless Thai dishes, but it also offers endless opportunities for personalization.
The process might seem involved at first, but once you experience the depth of flavor in your homemade version, you’ll never want to buy the store-bought kind again. Plus, there’s something deeply satisfying about creating such a fundamental component of Thai cuisine from scratch.
I encourage you to give this recipe a try, adjusting the flavors to suit your palate. Whether you prefer it fiery hot or gently warming, sweet or tangy, this versatile paste will become a staple in your kitchen just as it has in mine.

