There’s something magical about the way pumpkin transforms ordinary desserts into extraordinary fall treasures. As someone who’s been baking (and no-baking!) for years, I’ve found that pumpkin cheesecake is perhaps the most perfect marriage of creamy indulgence and autumn comfort. Today, I’m sharing my absolute favorite no-bake pumpkin cheesecake recipe that has become a staple at my fall gatherings and holiday tables.
When I say these mini pumpkin cheesecakes are easy, I truly mean it. No water baths, no cracked tops, no lengthy baking times—just pure, creamy pumpkin perfection in individual servings that will impress everyone who tastes them. The best part? They can be made days ahead, making them perfect for busy holiday entertaining.
Why You’ll Love These No-Bake Pumpkin Cheesecakes
Before we dive into the recipe, let me tell you why these have become my go-to fall dessert:
- Foolproof: Even if you’ve never made cheesecake before, you can’t mess these up
- Time-saving: No baking means less time in the kitchen and more time enjoying fall activities
- Make-ahead friendly: Actually tastes better after chilling overnight
- Customizable: The perfect canvas for your favorite toppings and mix-ins
- Portable: Individual servings make them perfect for potlucks and gatherings
- Impressive presentation: Looks like you spent hours, when it only takes minutes
Ingredients You’ll Need
For the graham cracker crust:
- 1½ cups graham cracker crumbs (about 12 full sheet graham crackers)
- ¼ cup granulated sugar
- 7 tablespoons unsalted butter, melted
- ½ teaspoon ground cinnamon
- Pinch of salt
For the pumpkin cheesecake filling:
- 16 oz (2 blocks) cream cheese, softened to room temperature
- 1 cup pumpkin puree (not pumpkin pie filling)
- 1 cup powdered sugar, sifted
- 2 teaspoons vanilla extract
- 1½ teaspoons pumpkin pie spice
- ½ teaspoon ground cinnamon
- ¼ teaspoon ground nutmeg
- 1 cup heavy whipping cream, whipped to stiff peaks
For the whipped cream topping:
- 1 cup heavy whipping cream, cold
- 3 tablespoons powdered sugar
- 1 teaspoon vanilla extract
Optional garnishes:
- Caramel sauce
- Chopped pecans or walnuts
- Cinnamon stick
- Extra sprinkle of cinnamon or pumpkin pie spice
- Crushed gingersnap cookies
Essential Equipment
I’ve found that having the right tools makes this recipe even easier:
- Electric mixer (stand or hand mixer)
- Mixing bowls
- Measuring cups and spoons
- Individual serving glasses or jars (I use 8 oz mason jars)
- Piping bag with star tip (optional but makes for a prettier presentation)
- Rubber spatula
- Food processor (optional, for making graham cracker crumbs)
Step-by-Step Instructions
Making the Graham Cracker Crust
- In a medium bowl, combine the graham cracker crumbs, granulated sugar, ground cinnamon, and salt.
- Pour in the melted butter and stir until the mixture resembles wet sand.
- Divide the mixture evenly among your serving glasses or jars (about 2-3 tablespoons per glass).
- Use the back of a spoon or the bottom of a small measuring cup to press the crumbs firmly into the bottom of each glass.
- Place the glasses in the refrigerator while you prepare the filling.
Preparing the Pumpkin Cheesecake Filling
- In a large bowl, beat the softened cream cheese with an electric mixer until smooth and creamy, about 2 minutes.
- Add the pumpkin puree, powdered sugar, vanilla extract, pumpkin pie spice, cinnamon, and nutmeg. Beat on medium speed until completely combined and smooth, stopping to scrape down the sides of the bowl as needed.
- In a separate bowl, whip the heavy cream until stiff peaks form.
- Gently fold the whipped cream into the pumpkin mixture using a rubber spatula. Be careful not to deflate the whipped cream—this is what gives your cheesecake its light, airy texture.
- The mixture should be thick, smooth, and uniform in color.
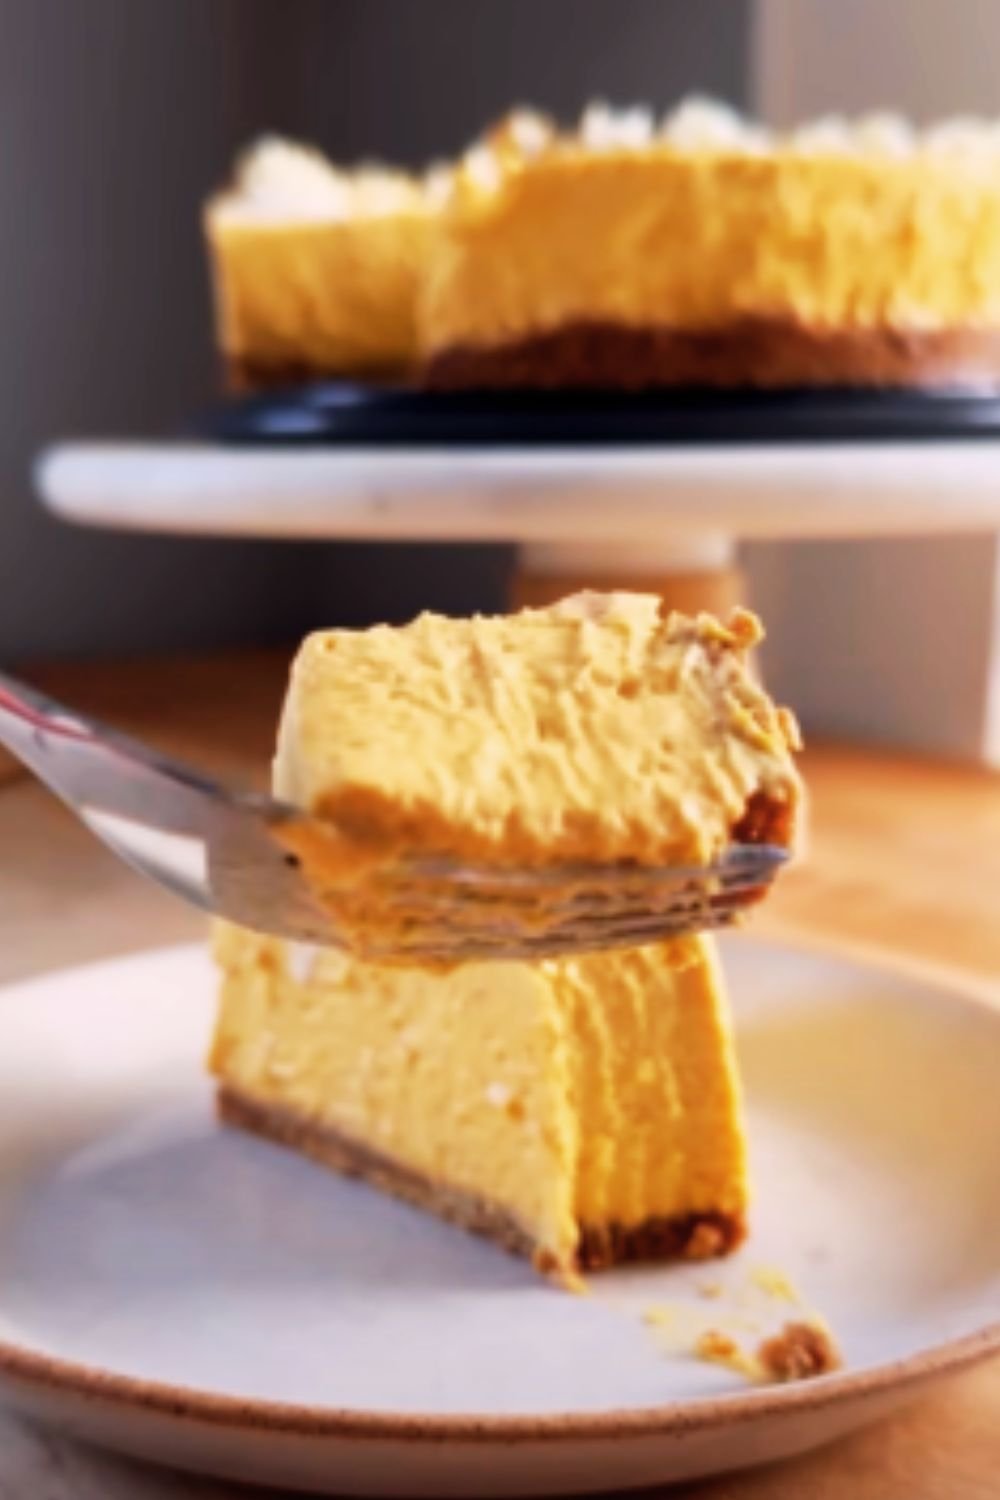
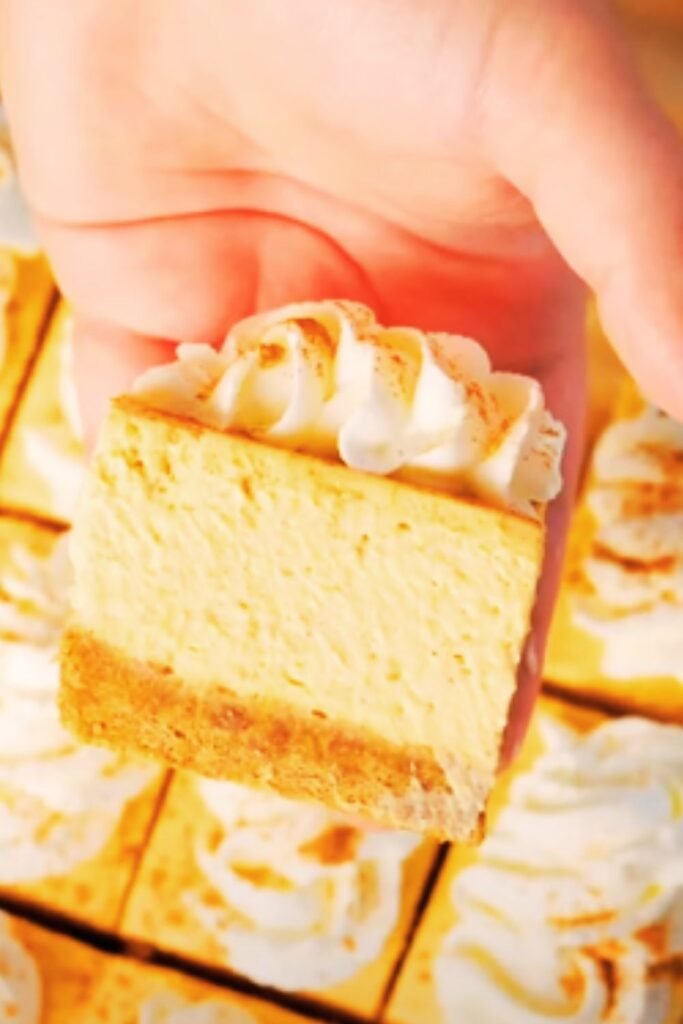
Assembling the Cheesecakes
- Remove the glasses with the prepared crusts from the refrigerator.
- Spoon or pipe the pumpkin cheesecake filling over the crusts, filling each glass about ¾ full.
- Smooth the tops with the back of a spoon or offset spatula.
- Cover each glass with plastic wrap and refrigerate for at least 4 hours, but preferably overnight.
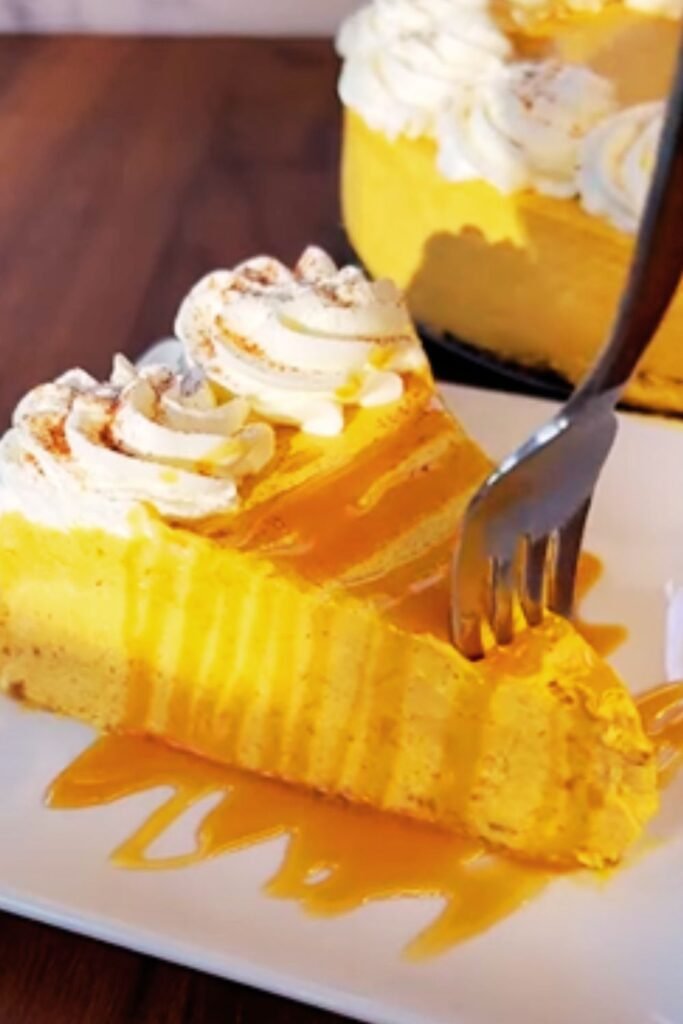
Adding the Whipped Cream Topping
- When ready to serve, prepare the whipped cream topping by beating the cold heavy cream, powdered sugar, and vanilla extract until stiff peaks form.
- Either spoon or pipe the whipped cream on top of each chilled cheesecake.
- Add your desired garnishes, such as a drizzle of caramel sauce, a sprinkle of cinnamon, or chopped nuts.
Recipe Variations
What I love about this recipe is how versatile it is. Here are some of my favorite variations I’ve developed over the years:
Gingersnap Crust
Replace the graham crackers with crushed gingersnap cookies for an extra spicy kick that complements the pumpkin beautifully.
Chocolate Lover’s Version
Add ¼ cup of cocoa powder to the crust mixture and fold ½ cup of mini chocolate chips into the pumpkin filling for a chocolate-pumpkin combination that’s irresistible.
Maple Pumpkin
Replace half the powdered sugar with pure maple syrup (reduce other liquid slightly) for a rich, maple-infused flavor that screams “autumn!”
Cinnamon Caramel
Layer homemade or store-bought caramel sauce between the crust and filling, then add another layer on top before the whipped cream.
Nutty Delight
Mix ½ cup of finely chopped pecans into the crust mixture and sprinkle toasted nuts on top for a delightful textural contrast.
Make-Ahead and Storage Tips
One of the reasons I make these cheesecakes so often is their convenience. Here’s how I handle make-ahead and storage:
- Make-ahead: These cheesecakes can be fully assembled (minus the whipped cream topping and garnishes) up to 3 days in advance.
- Storage: Keep refrigerated, covered with plastic wrap, for up to 5 days.
- Freezing: Yes, you can freeze these! Freeze without the whipped cream topping for up to 2 months. Thaw overnight in the refrigerator.
- Serving from frozen: For a semi-frozen treat (like a pumpkin cheesecake ice cream), remove from freezer about 20 minutes before serving.
Troubleshooting Common Issues
Even though this recipe is nearly foolproof, here are some solutions to potential challenges:
| Issue | Possible Cause | Solution |
|---|---|---|
| Runny filling | Cream cheese too soft or cream not whipped enough | Make sure cream cheese is softened but still cool; whip cream to stiff peaks |
| Grainy texture | Cream cheese not smooth enough before adding other ingredients | Beat cream cheese thoroughly until completely smooth before adding other ingredients |
| Crust crumbles | Not enough butter or not pressed firmly | Add an extra tablespoon of melted butter and press firmly with flat-bottomed object |
| Too sweet | Individual preference | Reduce powdered sugar by ¼ cup in the filling |
| Not spicy enough | Individual preference | Increase pumpkin pie spice by ½ teaspoon |
| Whipped cream deflates | Cream not cold enough or overbeaten | Use very cold cream and whip just until stiff peaks form |
Ingredient Substitutions for Dietary Needs
I’ve tested this recipe with various dietary adaptations, and here’s what works best:
| Ingredient | Substitution | Notes |
|---|---|---|
| Graham crackers | Gluten-free graham crackers or cookies | Maintains texture well |
| Cream cheese | Dairy-free cream cheese | Tofutti or Kite Hill work best |
| Heavy cream | Coconut cream (refrigerated overnight and solid part only) | Whips well but adds slight coconut flavor |
| Butter | Vegan butter or coconut oil | Use same amount |
| Granulated sugar | Coconut sugar | Slightly less sweet with caramel notes |
| Powdered sugar | Powdered monk fruit sweetener | Good for lower sugar needs |
Nutritional Information
For those watching their intake, here’s the approximate nutritional information per serving (based on 8 servings):
| Nutrient | Amount per Serving |
|---|---|
| Calories | 485 |
| Total Fat | 36g |
| Saturated Fat | 21g |
| Cholesterol | 115mg |
| Sodium | 295mg |
| Total Carbohydrate | 38g |
| Dietary Fiber | 1g |
| Total Sugars | 28g |
| Protein | 5g |
| Vitamin A | 45% DV |
| Calcium | 10% DV |
| Iron | 6% DV |
Serving Suggestions
I’ve served these cheesecakes at countless gatherings, and here are my favorite accompaniments:
- Hot apple cider or spiced chai tea
- Fresh apple slices
- A small scoop of vanilla ice cream on the side
- Coffee with cinnamon or pumpkin spice creamer
- Mulled cranberry juice
- Hot chocolate with cinnamon stick stirrers
Presentation Ideas for Special Occasions
When I want to make these extra special, here are my go-to presentation ideas:
- Serve in clear glasses or mason jars tied with raffia or twine
- Create a toppings bar with various garnishes for guests to customize
- For Thanksgiving, add a tiny fondant pumpkin on top
- For Halloween, add a chocolate cookie “tombstone” or candy pumpkin
- Use fall-colored sprinkles for a festive touch
- Arrange on a wooden board with fresh fall leaves (not for eating) and mini pumpkins
Why This Recipe Works: The Science Behind Perfect No-Bake Cheesecake
As someone who loves understanding the “why” behind successful recipes, I’ve spent time analyzing what makes these no-bake cheesecakes work so well:
The cream cheese provides fat and tanginess while creating structure. The whipped cream adds air and lightness to counterbalance the dense cream cheese. The powdered sugar dissolves easily without graininess. The pumpkin puree adds moisture and flavor but is counterbalanced by the thickening power of the cream cheese.
The refrigeration time allows the fats to firm up, creating a sliceable rather than pourable texture. And the ratio of filling to crust (about 3:1) ensures the perfect balance in each bite.
A Note on Pumpkin Puree
One thing I’ve learned through many batches of these cheesecakes is that not all pumpkin puree is created equal. Here’s what you should know:
- Canned pumpkin puree: Most consistent option and what I typically use
- Homemade pumpkin puree: Can be more watery; if using, drain in a fine-mesh sieve lined with cheesecloth for 1-2 hours before using
- Pumpkin pie filling: Not the same as puree! It contains added sugar and spices and will make your cheesecake too sweet
- Organic vs. conventional: Either works fine, but I find organic often has a more vibrant color
If your pumpkin puree seems watery, place it in a fine-mesh strainer lined with cheesecloth and let it drain for 30 minutes before measuring and using in the recipe.
Frequently Asked Questions
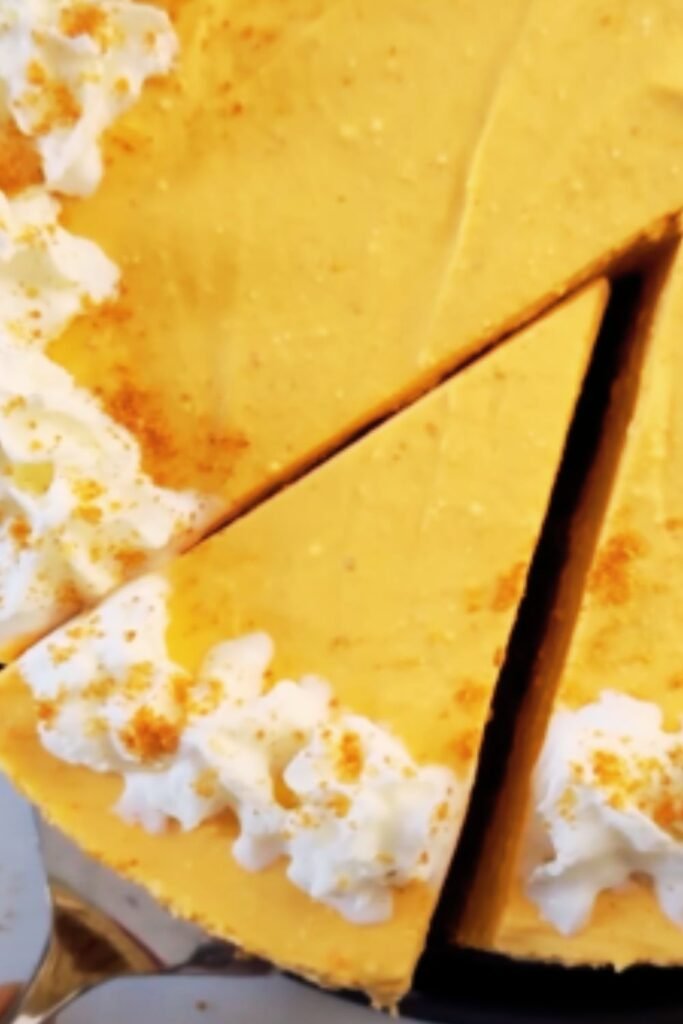
Q: Can I make this in a full-sized springform pan instead of individual servings?
Yes! This recipe will fill an 8-inch springform pan. Press the crust into the bottom of the pan and follow the same procedure. Refrigerate for at least 6 hours or overnight before serving.
Q: Why isn’t my filling firm enough?
Make sure your cream cheese is at room temperature but not too soft, and that you’ve whipped your heavy cream to stiff peaks before folding it in. Also ensure you’re giving the cheesecakes enough time to chill—at least 4 hours, but preferably overnight.
Q: Can I use fresh pumpkin instead of canned?
Absolutely! Roast your pumpkin, puree it, and then strain it through cheesecloth to remove excess moisture. Fresh pumpkin tends to be more watery than canned, which could affect the consistency of your filling.
Q: How far in advance can I make these?
You can make the entire dessert (minus the whipped cream topping) up to 3 days in advance. Add the whipped cream topping just before serving for the best presentation.
Q: My family doesn’t like pumpkin. Can I substitute something else?
Yes! You can substitute sweet potato puree or butternut squash puree for a similar flavor profile. Or for a completely different flavor, try using 1 cup of pureed berries (strained to remove seeds) for a fruity version.
Q: Is there a way to make these less sweet?
Absolutely. You can reduce the powdered sugar in the filling to ¾ cup or even ½ cup if you prefer a less sweet dessert. The cream cheese and pumpkin will still provide plenty of flavor.
Q: Do I really need to use powdered sugar, or can I use granulated?
Powdered sugar is recommended because it dissolves easily into the cream cheese mixture without creating a grainy texture. If you only have granulated sugar, you can pulverize it in a food processor to make it finer before using.
Q: Can I add alcohol to this recipe?
Yes! A tablespoon of bourbon, rum, or amaretto adds wonderful depth to the pumpkin filling. Add it when you’re mixing the cream cheese with the pumpkin puree.
Final Thoughts
My love affair with no-bake pumpkin cheesecakes began years ago when I needed a quick dessert for unexpected guests during the fall season. What started as a necessity has become a tradition, and I’ve perfected the recipe with each passing autumn.
What makes these cheesecakes so special isn’t just their incredible flavor—it’s their ability to bring people together without keeping me stuck in the kitchen. They’re the dessert I’m known for bringing to gatherings, the treat my family requests when the leaves start changing, and the recipe friends most often ask me to share.
I hope these no-bake pumpkin cheesecakes bring as much joy to your table as they have to mine. Whether you’re serving them at a formal Thanksgiving dinner or enjoying one with a cup of coffee on a crisp fall afternoon, they’re sure to become one of your favorite seasonal traditions.
Happy fall baking—or should I say, “no-baking”!