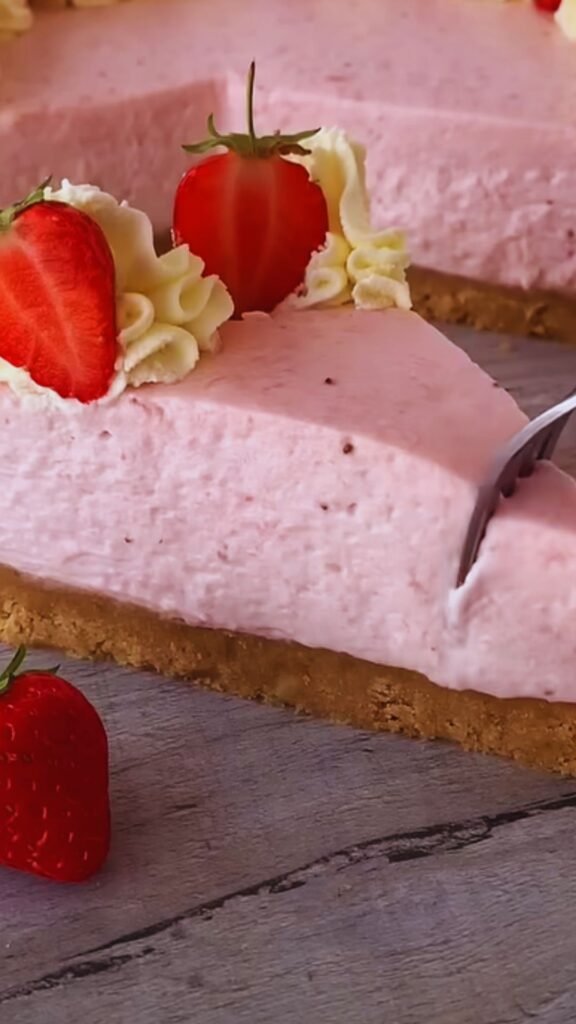
When summer heat rolls in, turning on the oven feels like the last thing I want to do. That’s when my no-bake dessert recipes become absolute lifesavers. Today, I’m thrilled to share one of my family’s all-time favorites – a luscious No-Bake Strawberry Chocolate Pie that combines the sweetness of ripe strawberries with the rich decadence of chocolate.
There’s something magical about the pairing of strawberries and chocolate – it’s a classic combination that never disappoints. This pie features a crisp chocolate cookie crust, a silky chocolate ganache layer, and a heavenly strawberry mousse topping that’s both light and indulgent at the same time. The best part? You don’t need to turn on your oven, making it perfect for those sweltering summer days when you’re craving something sweet but cool.
I first created this recipe when hosting a summer garden party five years ago. The temperature was soaring above 90°F, but I had promised my guests a special dessert. This pie was born out of necessity, but it has since become my most requested recipe for gatherings year-round. Let me guide you through creating this showstopper dessert that will have everyone asking for seconds!
Why You’ll Love This No-Bake Pie
Before diving into the recipe, let me share why this particular no-bake creation deserves a spot in your dessert rotation:
- No oven required – Perfect for hot summer days or when your oven is occupied with other dishes
- Make-ahead friendly – Can be prepared up to 2 days in advance
- Visually stunning – Creates a beautiful presentation with minimal effort
- Customizable – Works wonderfully with other berries like raspberries or blackberries
- Crowd-pleaser – Appeals to both chocolate lovers and fruit enthusiasts
- Simple ingredients – Uses items you likely already have in your pantry and refrigerator
I’ve served this at everything from casual backyard gatherings to more formal dinner parties, and it never fails to impress. The combination of textures – from the crisp crust to the silky chocolate layer and cloud-like strawberry mousse – creates a dessert experience that feels much more complex than the actual effort required.
Ingredients You’ll Need
For a successful No-Bake Strawberry Chocolate Pie, quality ingredients make all the difference. Here’s everything you’ll need, broken down by component:
For the Chocolate Cookie Crust:
- 24 chocolate sandwich cookies (like Oreos)
- 6 tablespoons unsalted butter, melted
- Pinch of salt
For the Chocolate Ganache Layer:
- 8 ounces high-quality semisweet chocolate, chopped
- 1 cup heavy cream
- 2 tablespoons unsalted butter, at room temperature
- 1 teaspoon pure vanilla extract
For the Strawberry Mousse:
- 2 pounds fresh strawberries, divided (1½ pounds for mousse, ½ pound for topping)
- ¾ cup granulated sugar
- 2 tablespoons fresh lemon juice
- 2 teaspoons unflavored gelatin powder
- 3 tablespoons cold water
- 2 cups heavy cream, chilled
- ¼ cup powdered sugar
- 1 teaspoon pure vanilla extract
For the Topping:
- 8 ounces fresh strawberries, sliced
- 2 tablespoons strawberry jam, warmed
- Chocolate curls or shavings (optional)
- Fresh mint leaves (optional)
Equipment Needed
One of the beauties of this recipe is that it doesn’t require specialized equipment, though a few key items will make preparation easier:
- 9-inch springform pan
- Food processor or blender
- Electric mixer (stand or handheld)
- Medium saucepan
- Mixing bowls (various sizes)
- Rubber spatula
- Sharp knife
- Measuring cups and spoons
Detailed Instructions
Now let’s break down the process step by step. I promise it’s easier than it might seem at first glance!
Step 1: Prepare the Chocolate Cookie Crust
- Place the chocolate sandwich cookies in a food processor and pulse until they form fine crumbs.
- Add the melted butter and salt to the cookie crumbs and pulse until the mixture resembles wet sand.
- Transfer the crumb mixture to a 9-inch springform pan.
- Using the bottom of a measuring cup or glass, press the crumbs firmly and evenly across the bottom and about 1½ inches up the sides of the pan.
- Place the crust in the refrigerator to chill while preparing the filling (at least 30 minutes).
Pro Tip: If you don’t have a food processor, place the cookies in a heavy-duty zip-top bag and crush them with a rolling pin. Then mix with the melted butter in a bowl.
Step 2: Create the Chocolate Ganache Layer
- Place the chopped chocolate in a medium heatproof bowl.
- In a small saucepan, heat the heavy cream over medium heat just until it begins to simmer around the edges (do not boil).
- Pour the hot cream over the chocolate and let it sit undisturbed for 2-3 minutes.
- Gently whisk the mixture until smooth and the chocolate is completely melted.
- Add the room temperature butter and vanilla extract, whisking until incorporated and glossy.
- Pour the ganache into the chilled crust, spreading it evenly with a spatula.
- Return the pan to the refrigerator to set while preparing the strawberry mousse (about 30 minutes).
Pro Tip: For the smoothest ganache, make sure your chocolate is finely chopped and your butter is truly at room temperature.
Step 3: Prepare the Strawberry Mousse
- Hull and quarter 1½ pounds of the strawberries. Place them in a blender or food processor with the granulated sugar and lemon juice. Purée until smooth.
- Pour the purée through a fine-mesh sieve into a bowl, pressing with a spatula to extract as much liquid as possible while leaving seeds behind. You should have approximately 2½ cups of strawberry purée.
- In a small microwave-safe bowl, sprinkle the gelatin over the cold water and let it sit for 5 minutes to bloom.
- Heat the bloomed gelatin in the microwave for 10-15 seconds, or until it dissolves completely and becomes liquid.
- Whisk the dissolved gelatin into the strawberry purée while it’s still warm.
- Refrigerate the strawberry mixture, stirring occasionally, until it begins to thicken slightly but is not set, about 30-45 minutes.
- In a large, chilled bowl, whip the heavy cream with an electric mixer until soft peaks form.
- Add the powdered sugar and vanilla extract, continuing to whip until stiff peaks form.
- Gently fold the thickened strawberry purée into the whipped cream using a rubber spatula, maintaining as much air in the mixture as possible.
- Pour the strawberry mousse over the set chocolate ganache layer, smoothing the top with a spatula.
- Refrigerate the pie for at least 4 hours, preferably overnight.
Pro Tip: When folding the strawberry purée into the whipped cream, use a gentle hand and a figure-eight motion to maintain the mousse’s airy texture.
Step 4: Decorate and Serve
- About 30 minutes before serving, prepare the topping.
- Arrange the sliced fresh strawberries over the set mousse in a decorative pattern.
- Gently brush the warmed strawberry jam over the berries for a glossy finish.
- If desired, sprinkle chocolate shavings around the edges and garnish with fresh mint leaves.
- Carefully remove the sides of the springform pan and transfer the pie to a serving plate.
- For the cleanest slices, dip a sharp knife in hot water, wipe it dry, and then cut the pie. Repeat this process for each slice.
Recipe Variations
One of the joys of this recipe is how adaptable it is. Here are some of my favorite variations:
Berry Medley Version
Substitute half of the strawberries with a mixture of raspberries, blackberries, and blueberries for a more complex flavor profile.
White Chocolate Swap
Replace the semisweet chocolate with white chocolate in the ganache layer for a sweeter, more delicate flavor that beautifully complements the strawberries.
Nutty Chocolate Crust
Add ½ cup of finely chopped toasted hazelnuts or almonds to the cookie crust for extra texture and flavor dimension.
Boozy Adult Version
Add 2 tablespoons of Grand Marnier, Chambord, or Kirsch to the strawberry purée for a sophisticated twist.
Chocolate-Covered Strawberry Topping
Instead of fresh strawberry slices, top the pie with chocolate-dipped strawberries for an even more decadent presentation.
Make-Ahead and Storage Tips
This pie is perfect for planning ahead for special occasions:
- Make-Ahead Schedule: The complete pie can be made up to 2 days in advance and stored in the refrigerator. Add the fresh strawberry topping just before serving for the best appearance.
- Storage: Cover loosely with plastic wrap and refrigerate for up to 4 days.
- Freezing: The pie (without fresh strawberry topping) can be frozen for up to 1 month. Wrap tightly in plastic wrap and then aluminum foil. Thaw overnight in the refrigerator before decorating and serving.
- Individual Portions: For easier future servings, slice the pie before freezing and place pieces in airtight containers with parchment paper between layers.
Nutritional Information
For those who are mindful of dietary considerations, here’s the approximate nutritional breakdown per serving (assuming 12 servings per pie):
| Nutrient | Amount per Serving |
|---|---|
| Calories | 487 |
| Total Fat | 34g |
| Saturated Fat | 20g |
| Cholesterol | 93mg |
| Sodium | 127mg |
| Total Carbohydrates | 43g |
| Dietary Fiber | 3g |
| Sugars | 32g |
| Protein | 4g |
Note: Values are approximate and may vary based on specific ingredients used.
Serving Suggestions
While this pie is certainly spectacular on its own, here are some lovely accompaniments to consider:
- A dollop of lightly sweetened whipped cream
- A scoop of vanilla bean ice cream
- A drizzle of additional chocolate ganache
- A small glass of chilled sparkling water with a splash of cranberry juice
- A cup of rich, dark coffee or espresso
- Iced coffee with a splash of cream
- Chilled milk for the kids
- Hot chamomile or mint tea
Tips for Perfect Results Every Time
After making this pie countless times, I’ve gathered some insights that help ensure success:
Temperature Matters
- All refrigerated ingredients should be properly chilled
- Allow the ganache to set completely before adding the mousse layer
- The strawberry-gelatin mixture should be cool but not set when folding into the whipped cream
Texture Troubleshooting
- If your ganache is too thin, your cream may have been too hot or you may need more chocolate
- If your mousse isn’t setting properly, you may need more gelatin or longer refrigeration time
- If your crust is crumbly, add a bit more melted butter to help it hold together
Flavor Enhancement
- Use the ripest, most fragrant strawberries you can find
- Don’t skip the lemon juice – it brightens the strawberry flavor significantly
- High-quality chocolate makes a noticeable difference in the ganache layer
Visual Appeal
- Take your time when arranging the strawberry topping – this is your chance to make the dessert truly stunning
- Consider using a cake decorating turntable if you have one for easier access while decorating
- For the most impressive presentation, make sure the sides of your springform pan are clean before removing them
Special Dietary Adaptations
This recipe can be adapted for various dietary needs:
Gluten-Free Version
Use gluten-free chocolate sandwich cookies for the crust. The rest of the recipe is naturally gluten-free, but always check your specific ingredients for hidden gluten.
Vegan Adaptation
- Replace the cookies with vegan chocolate cookies
- Substitute the butter with coconut oil
- Use coconut cream instead of heavy cream
- Replace gelatin with agar-agar powder (use about half the amount and follow package instructions for activation)
- Use vegan chocolate for the ganache
Lower Sugar Option
- Reduce the granulated sugar in the strawberry mousse to ½ cup
- Use dark chocolate with 70% or higher cocoa content for the ganache
- Skip the jam glaze and use fresh berries only for topping
Frequently Asked Questions
Q: Can I use frozen strawberries for this recipe?
A: Yes, you can use frozen strawberries for the mousse portion, but make sure to thaw them completely and drain excess liquid before pureeing. For the topping, fresh strawberries will provide the best appearance and texture.
Q: My mousse isn’t setting properly. What went wrong?
A: This typically happens when the gelatin isn’t properly bloomed or activated. Make sure to let the gelatin sit in cold water for the full 5 minutes, then heat it until completely dissolved. Also, be sure the strawberry mixture has begun to thicken before folding in the whipped cream.
Q: Can I make this in a regular pie dish instead of a springform pan?
A: Yes, though it will be more challenging to serve cleanly. If using a pie dish, I recommend lining it with parchment paper with overhanging edges to help lift the pie out after it’s set.
Q: How far in advance can I make this pie?
A: The complete pie (without the fresh strawberry topping) can be made up to 2 days in advance. Add the fresh strawberry decoration within a few hours of serving for the best appearance.
Q: My chocolate ganache seized and became grainy. How can I fix it?
A: This usually happens when the chocolate is exposed to moisture or if the cream is too hot. To fix it, try whisking in a tablespoon of warm heavy cream until the mixture becomes smooth again.
Q: Is there a non-dairy alternative I can use for the heavy cream?
A: Yes, coconut cream works well as a substitute for heavy cream in both the ganache and mousse layers. Make sure to use the thick, full-fat version from a can, and chill it overnight before whipping for the mousse.
Q: Can I use a different type of berry?
A: Absolutely! Raspberries work particularly well, as do blackberries. You may need to adjust the sugar slightly depending on the natural sweetness of the berries you choose.
The Story Behind This Recipe
I still remember the first time I served this pie at a summer garden party. The temperature was hovering around 95°F, and the thought of turning on my oven seemed absolutely criminal. I had fresh strawberries from the farmers’ market sitting on my counter, beckoning to be transformed into something special.
Drawing inspiration from a classic strawberry mousse my grandmother used to make and my own love for chocolate-covered strawberries, I experimented with layering these flavors into a no-bake format. The first attempt was good but not quite perfect – the mousse was a bit too soft and the ganache too thick.
After a few more attempts, I found the right balance of textures and flavors. When I finally served the perfected version at my garden party, it disappeared within minutes, with guests scraping the serving plate for the last bits of chocolate crust. One friend, a self-proclaimed dessert connoisseur, declared it better than any restaurant dessert she’d had that year.
Since then, this pie has become my signature dessert, requested for birthdays, holiday gatherings, and potlucks. I’ve taught countless friends how to make it, tweaking the recipe slightly each time to accommodate different preferences and dietary needs.
What I love most about sharing this recipe is watching people’s faces light up at that first bite – when the chocolate and strawberry flavors meld together in perfect harmony. It’s a simple pleasure, but one worth savoring.
Final Thoughts
There’s something truly magical about creating a dessert that not only tastes divine but also brings people together. This No-Bake Strawberry Chocolate Pie has become more than just a recipe in my collection – it’s a way to show love, celebrate special moments, and create memories around the table.
Whether you’re making it for a special occasion or simply because you’re craving something sweet on a warm summer evening, I hope this pie brings as much joy to your table as it has to mine over the years. Remember that cooking is as much about the journey as the destination – so enjoy the process, embrace any small imperfections, and most importantly, savor each delicious bite.
If you do try this recipe, I’d love to hear how it turned out for you and any creative variations you might have tried. The best recipes are those that evolve and take on new life as they’re shared and adapted by different hands.
Happy no-baking!