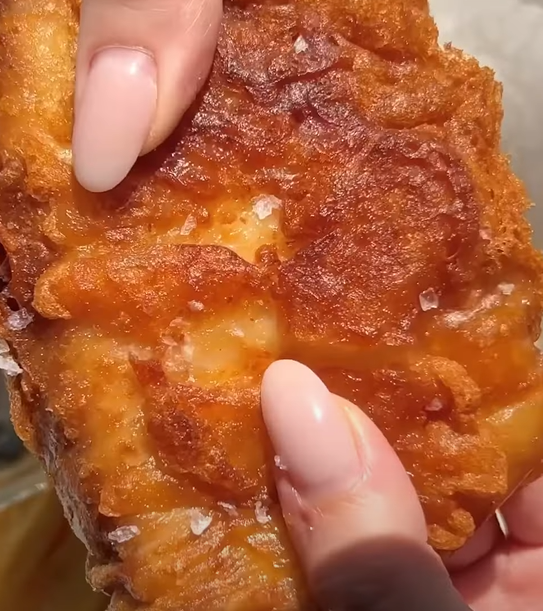
There’s something truly magical about the perfect plate of beer battered fish and chips. I’ve spent countless hours in my kitchen, experimenting with different techniques, batters, and cooking methods to create what I genuinely believe is the ultimate version of this beloved dish. Today, I’m sharing every secret, tip, and trick I’ve learned along the way to help you create restaurant-quality fish and chips in your own home.
Growing up, fish and chips was always my family’s Friday night tradition. My grandmother would take me to the local chippy, where we’d wait in line for what seemed like hours, the anticipation building with every minute. The smell of hot oil, the sound of batter hitting the fryer, and that first bite of crispy, flaky fish wrapped in golden batter – these memories shaped my passion for this dish.
Over the years, I’ve refined my technique through trial and error, studying traditional methods while incorporating modern insights. What I’m about to share with you isn’t just another recipe; it’s a comprehensive guide that will transform your approach to making fish and chips forever.
Understanding the Foundation: What Makes Perfect Beer Batter
The secret to exceptional beer battered fish lies in understanding the science behind the batter. When I first started making this dish, I treated the batter as an afterthought – a simple mixture to coat the fish. I was wrong. The batter is the star of the show, creating that perfect contrast between the crispy exterior and tender fish inside.
Beer Selection Impact: The type of beer you choose dramatically affects your final result. Lighter beers create a more delicate, crispy coating, while darker beers add complexity and color. I’ve tested dozens of varieties, and my preference leans toward a good-quality lager or pale ale with moderate carbonation.
Temperature Matters: One crucial element I discovered is batter temperature. Cold batter hitting hot oil creates steam, which contributes to that light, airy texture we’re after. I always keep my batter chilled until the moment I’m ready to use it.
Consistency Control: The perfect batter should coat the back of a spoon but still drip freely. Too thick, and you’ll get a heavy, doughy coating. Too thin, and it won’t adhere properly to the fish.
Essential Ingredients and Their Roles
| Ingredient | Quantity | Purpose | Quality Notes |
|---|---|---|---|
| White Fish Fillets | 2 lbs | Main protein | Cod, haddock, or halibut work best |
| All-Purpose Flour | 2 cups | Batter base and dusting | Sift for best results |
| Cornstarch | ½ cup | Crispiness enhancer | Creates lighter texture |
| Baking Powder | 2 tsp | Leavening agent | Ensures fluffy batter |
| Salt | 1 tsp | Flavor enhancer | Sea salt preferred |
| White Pepper | ½ tsp | Seasoning | Milder than black pepper |
| Cold Beer | 1½ cups | Liquid base | Lager or pale ale recommended |
| Egg White | 1 large | Binding agent | Whipped to soft peaks |
| Vegetable Oil | 6-8 cups | Frying medium | High smoke point essential |
The Perfect Potato: Choosing and Preparing Your Chips
I cannot overstate the importance of selecting the right potatoes for your chips. After testing numerous varieties, I’ve found that Russet potatoes consistently deliver the best results. Their high starch content creates that perfect fluffy interior while achieving a golden, crispy exterior.
Preparation Process: I always start by washing and peeling my potatoes, then cutting them into uniform pieces – approximately ½ inch thick for optimal cooking. The key is consistency; uneven cuts lead to uneven cooking, with some chips burning while others remain undercooked.
The Double-Fry Method: This technique revolutionized my chip-making process. The first fry at a lower temperature (325°F) cooks the potato through, while the second fry at higher temperature (375°F) creates that coveted crispy exterior.
Soaking Strategy: I soak my cut potatoes in cold water for at least 30 minutes before cooking. This removes excess starch and prevents the chips from sticking together during frying.
Mastering the Frying Process
The frying process requires precision and attention to detail. I use a large, heavy-bottomed pot or deep fryer, maintaining oil temperature with a reliable thermometer. Temperature fluctuations are the enemy of consistent results.
Oil Temperature Guide:
- First fry (blanching): 325°F for 3-4 minutes
- Second fry (crisping): 375°F for 2-3 minutes
- Fish frying: 375°F for 4-6 minutes depending on thickness
Safety Considerations: I always keep a fire extinguisher nearby and never leave hot oil unattended. Water and hot oil don’t mix, so I ensure all utensils and fish are completely dry before frying.
| Frying Stage | Temperature | Duration | Visual Cues |
|---|---|---|---|
| Chip Blanching | 325°F | 3-4 minutes | No browning, tender when pierced |
| Chip Finishing | 375°F | 2-3 minutes | Golden brown, crispy exterior |
| Fish Frying | 375°F | 4-6 minutes | Deep golden, floating on surface |
| Oil Recovery | 375°F | 1-2 minutes | Between batches for temperature stability |
Step-by-Step Cooking Instructions
Preparing the Fish:
- I pat the fish fillets completely dry with paper towels
- Cut into portion-sized pieces (about 6 ounces each)
- Season lightly with salt and let rest for 10 minutes
- Dust each piece lightly with flour before battering
Creating the Perfect Batter:
- In a large bowl, I whisk together flour, cornstarch, baking powder, salt, and white pepper
- Gradually add cold beer, whisking constantly to prevent lumps
- The batter should be smooth and coat the back of a spoon
- In a separate bowl, I whip the egg white to soft peaks
- Gently fold the whipped egg white into the batter just before using
Frying Sequence:
- Heat oil to 325°F and blanch the chips for 3-4 minutes
- Remove chips and drain on paper towels
- Increase oil temperature to 375°F
- Dip fish pieces in batter, allowing excess to drip off
- Carefully lower into hot oil, frying 2-3 pieces at a time
- Fry fish for 4-6 minutes until deep golden brown
- Remove fish and keep warm in a low oven
- Return chips to oil for final 2-3 minute crisp-up
Advanced Techniques for Professional Results
Through years of experimentation, I’ve developed several advanced techniques that elevate homemade fish and chips to restaurant quality.
Batter Resting: I let my batter rest for 15-20 minutes after mixing. This allows the flour to fully hydrate and creates a smoother, more cohesive coating.
Temperature Control: I use two thermometers – one clipped to the pot and a digital probe thermometer for double-checking. Consistent temperature is crucial for even cooking.
Batch Cooking Strategy: I never overcrowd the fryer. Too many pieces at once drops the oil temperature dramatically, resulting in greasy, soggy food.
Drainage Technique: I use a wire rack set over a baking sheet for draining, which prevents the bottom from getting soggy while keeping the top crispy.
Common Mistakes and How to Avoid Them
Over the years, I’ve made every mistake possible when making fish and chips. Here are the most common pitfalls and how to avoid them:
Mistake 1: Using the wrong flour ratio Many recipes use only all-purpose flour, but I’ve found that adding cornstarch creates a much lighter, crispier coating. The ratio of 4:1 flour to cornstarch is perfect.
Mistake 2: Overmixing the batter I used to think more mixing meant better batter, but overmixing develops gluten, creating a tough, chewy coating. Mix just until combined.
Mistake 3: Frying at incorrect temperatures Temperature is everything in deep frying. Too low, and your food absorbs oil. Too high, and the outside burns while the inside remains raw.
Mistake 4: Not drying the fish properly Wet fish creates steam when it hits the hot oil, preventing proper browning and causing the batter to slip off.
Nutritional Considerations and Healthier Alternatives
While traditional fish and chips isn’t exactly health food, I’ve developed some modifications that maintain the dish’s integrity while reducing calories and improving nutrition.
| Cooking Method | Calories per Serving | Fat Content | Prep Time |
|---|---|---|---|
| Traditional Deep Fry | 850-950 | 45-55g | 45 minutes |
| Oven “Fried” Version | 650-750 | 25-35g | 50 minutes |
| Air Fryer Method | 600-700 | 20-30g | 40 minutes |
| Grilled Fish/Baked Chips | 500-600 | 15-25g | 55 minutes |
Healthier Modifications:
- Using whole wheat flour adds fiber and nutrients
- Baking chips at high heat with minimal oil reduces fat content
- Air frying creates similar textures with significantly less oil
- Choosing leaner fish varieties like cod or halibut over fattier options
Regional Variations and Cultural Adaptations
During my culinary travels, I’ve encountered fascinating regional variations of beer battered fish. Each region adds its own twist while maintaining the dish’s essential character.
British Traditional: The original uses a simple batter of flour, beer, and salt, often served with mushy peas and malt vinegar.
Australian Style: Often includes a touch of lemon zest in the batter and is served with tartare sauce and lemon wedges.
Canadian Approach: Sometimes incorporates maple syrup in the batter for a subtle sweetness.
American Adaptations: Various regions add different seasonings, from Old Bay in Maryland to Cajun spices in Louisiana.
Storage and Reheating Guidelines
Nothing beats fresh fish and chips, but sometimes you need to store leftovers or prepare components ahead of time.
Storage Methods:
- Refrigerate cooked fish and chips for up to 2 days
- Freeze battered (uncooked) fish for up to 1 month
- Store chips separately from fish to maintain texture
Reheating Techniques:
- Oven: 400°F for 10-12 minutes for best results
- Air fryer: 380°F for 5-7 minutes
- Avoid microwave reheating as it makes everything soggy
Serving Suggestions and Accompaniments
The perfect fish and chips deserves equally perfect accompaniments. I’ve experimented with countless combinations to find the ideal pairings.
Classic Accompaniments:
- Malt vinegar for that traditional tang
- Tartare sauce made with fresh herbs
- Mushy peas for authentic British experience
- Coleslaw for fresh crunch and color contrast
- Lemon wedges for bright acidity
Modern Additions:
- Sriracha mayo for heat lovers
- Avocado crema for richness
- Pickled vegetables for acidity
- Fresh herbs like parsley or dill
Side Dish Suggestions:
- Garden salad with vinaigrette
- Roasted vegetables
- Corn on the cob
- Fresh fruit salad
Troubleshooting Guide
Even experienced cooks encounter problems. Here’s my troubleshooting guide for common issues:
Problem: Batter won’t stick to fish Solution: Ensure fish is completely dry and lightly dust with flour before battering
Problem: Soggy chips Solution: Double-fry method and proper draining on wire racks
Problem: Greasy coating Solution: Oil temperature too low; maintain 375°F for fish frying
Problem: Burnt exterior, raw interior Solution: Oil temperature too high; reduce to 350°F and cook longer
Problem: Tough, chewy batter Solution: Overmixed batter; mix just until combined next time
Equipment Recommendations
Having the right equipment makes a significant difference in your results. Here’s what I consider essential:
Must-Have Items:
- Deep, heavy-bottomed pot (at least 6-quart capacity)
- Reliable thermometer (I prefer digital probe types)
- Wire cooling racks
- Large slotted spoon or spider strainer
- Paper towels for draining
Nice-to-Have Items:
- Deep fryer for temperature control
- Mandoline slicer for uniform chips
- Kitchen scale for precise measurements
Q&A Section
Q: What’s the best fish to use for beer battered fish and chips?
I consistently get the best results with firm, white fish varieties. Cod is my top choice because of its mild flavor and perfect flake texture. Haddock is excellent too, offering a slightly sweeter taste. Halibut works wonderfully but can be more expensive. I avoid oily fish like salmon or mackerel as they don’t complement the beer batter as well.
Q: Can I make the batter ahead of time?
I don’t recommend making the complete batter too far in advance, as the carbonation from the beer dissipates and the leavening agents lose their effectiveness. However, you can mix the dry ingredients up to a day ahead and store them covered. Add the beer and whipped egg white just before using for the best results.
Q: Why does my batter fall off the fish during frying?
This usually happens because the fish wasn’t dry enough or the oil temperature was incorrect. I always pat the fish completely dry with paper towels, then dust lightly with flour before dipping in batter. Also, make sure your oil is at the proper temperature (375°F) – too low and the batter won’t set properly.
Q: How do I know when the fish is perfectly cooked?
The fish is done when it reaches an internal temperature of 145°F and flakes easily with a fork. Visually, the batter should be deep golden brown and the fish should float to the surface. I usually allow 4-6 minutes of frying time depending on the thickness of the fillet.
Q: Can I use a different type of flour for the batter?
While all-purpose flour works best, you can experiment with alternatives. I’ve had success with a combination of all-purpose and rice flour, which creates an even crispier coating. Avoid using only specialty flours like almond or coconut flour, as they don’t create the proper texture. The addition of cornstarch to regular flour is my secret for extra crispiness.
Q: What’s the secret to getting restaurant-quality chips at home?
The key is the double-fry method I described earlier. First, blanch the chips at 325°F for 3-4 minutes to cook them through, then fry again at 375°F for 2-3 minutes to crisp the exterior. Also, choosing the right potato variety (I prefer Russets) and soaking them in cold water before frying makes a huge difference.
Q: How much oil do I need, and can I reuse it?
I typically use 6-8 cups of oil in my large pot, ensuring the oil is at least 3 inches deep. You can definitely reuse the oil – I strain it through a fine-mesh sieve after it cools and store it in the refrigerator for up to a week. The oil can typically be used 2-3 times before it starts to break down and affect flavor.
Q: My chips keep sticking together during frying. How do I prevent this?
Soaking the cut potatoes in cold water for at least 30 minutes removes excess starch, which is usually the culprit behind sticking chips. After soaking, pat them completely dry with towels. Also, don’t overcrowd the fryer – cook chips in smaller batches so they have room to move freely in the oil.
Creating the perfect beer battered fish and chips is both an art and a science. It requires attention to detail, quality ingredients, and proper technique. But when you nail it – when you bite into that perfectly crispy batter revealing flaky, tender fish inside, accompanied by golden, fluffy chips – you’ll understand why I’m so passionate about this dish.
I’ve shared everything I’ve learned through years of experimentation and refinement. Some techniques might seem fussy, but each one contributes to the final result. Start with the basics, master the fundamentals, then experiment with your own variations.
Remember, cooking is about more than just following instructions. It’s about understanding your ingredients, respecting the process, and most importantly, enjoying the journey. Every time I make fish and chips, I’m transported back to those childhood memories of Friday nights with my grandmother, and I hope this recipe helps you create equally wonderful memories with your own family and friends.
The beauty of homemade fish and chips lies not just in the superior flavor and texture you can achieve, but in the satisfaction of mastering a technique that seemed impossible at first. Take your time, be patient with yourself, and don’t be discouraged if your first attempt isn’t perfect. Like any worthwhile skill, it improves with practice.
Now get into that kitchen and start frying – your perfect plate of beer battered fish and chips awaits!