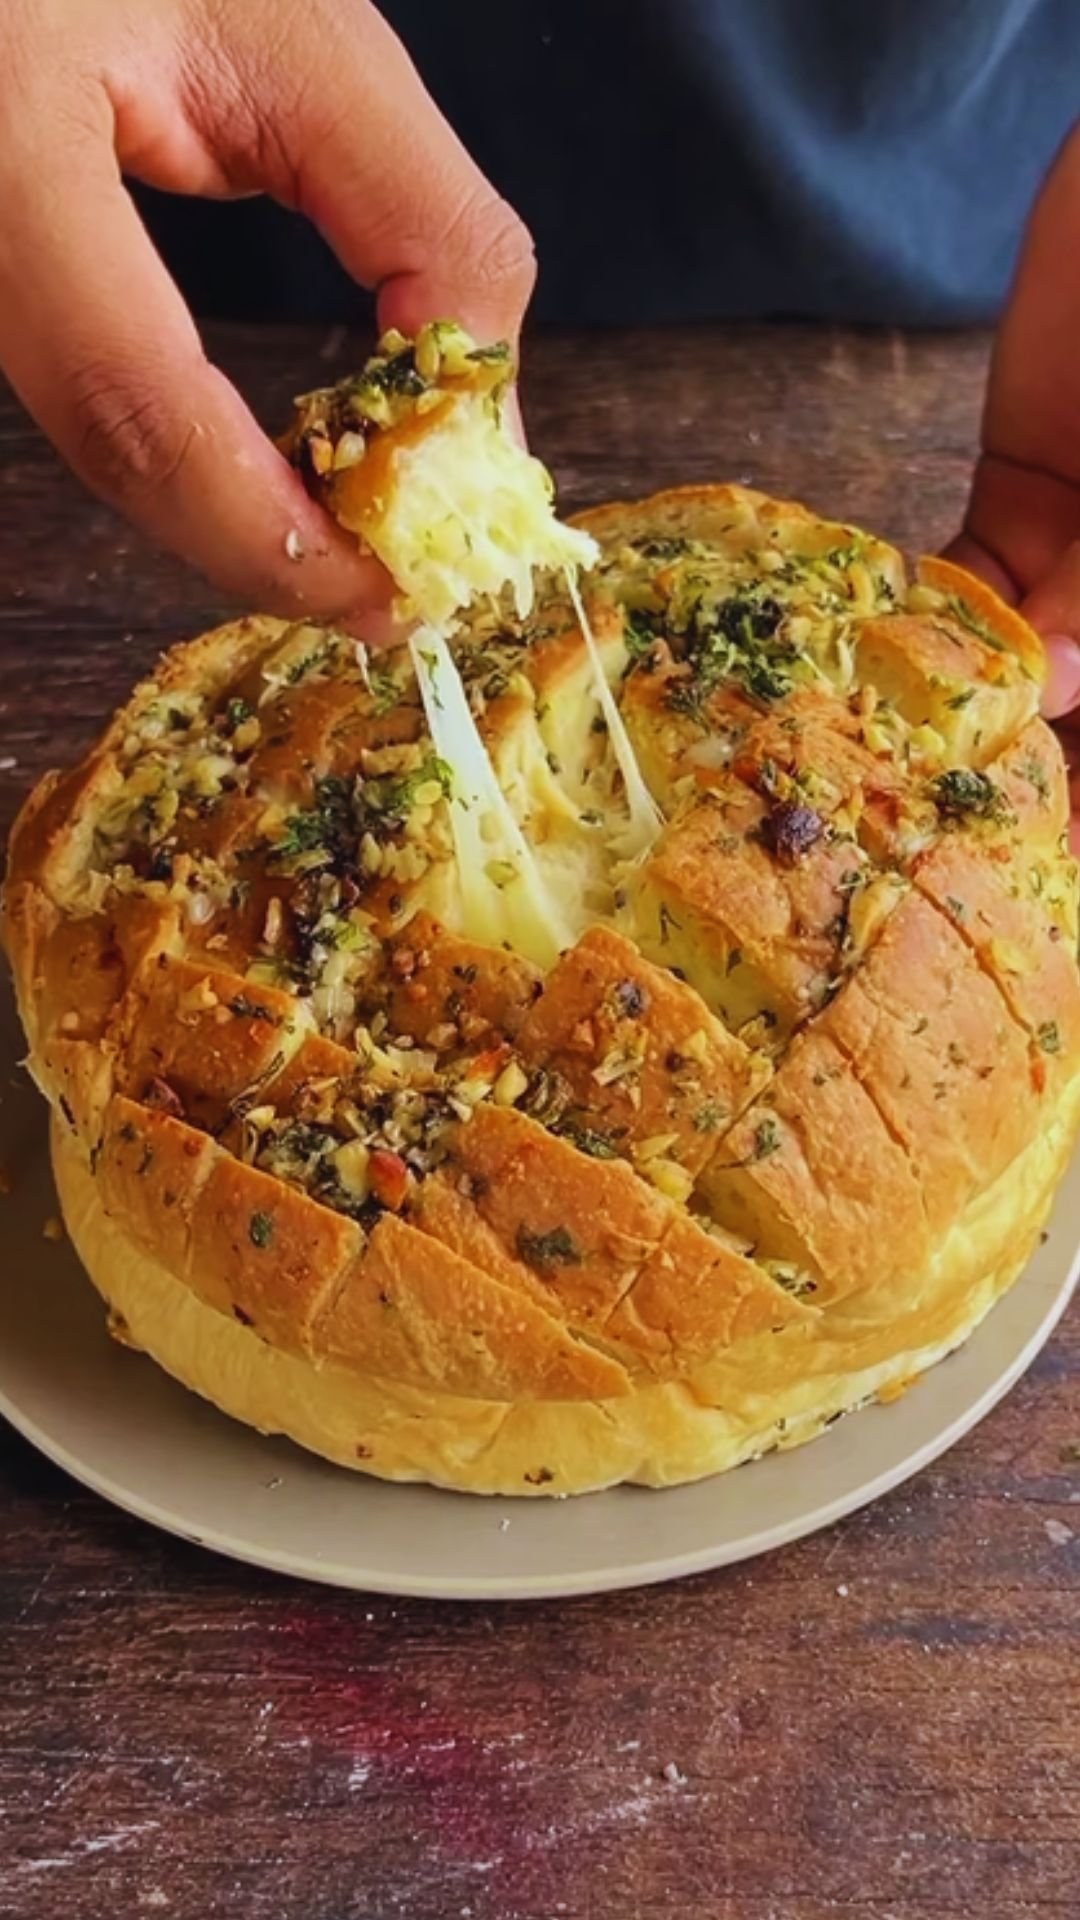
There’s something magical about the moment when someone at the dinner table reaches for that first piece of freshly baked garlic bread. The steam rises, carrying with it the irresistible aroma of butter, garlic, and herbs. But when you add cheese to the equation and transform it into a pull-apart masterpiece? Well, you’ve just elevated a simple side dish into the star of the show.
I’ve been perfecting my cheesy pull-apart garlic bread recipe for years, tweaking ingredients and methods until I achieved what my friends and family now request at every gathering. This isn’t just garlic bread—it’s an experience, a conversation starter, and sometimes even the main attraction despite whatever else I’ve cooked.
In this article, I’ll share my tried-and-true recipe, along with tips, variations, and the science behind what makes this bread so utterly craveable. Whether you’re hosting a dinner party or just craving something special on a weeknight, this recipe will make you the hero of any mealtime.
The Magic Behind Perfect Pull-Apart Bread
Before we dive into the recipe, let’s talk about what makes pull-apart bread so special. Unlike traditional garlic bread that’s sliced completely through, pull-apart bread features a series of deep cuts that create distinct segments while keeping the loaf intact. This design serves a dual purpose:
- It allows the buttery garlic mixture to penetrate deep into every crevice
- It creates those dramatic, cheese-stretching moments when guests pull pieces apart
The key is in the cutting technique and the layering of flavors. When done right, every piece offers the perfect balance of crispy exterior and soft, flavor-infused interior. It’s an interactive food experience that brings people together—literally reaching for the same loaf—which is exactly what good food should do.
Ingredients You’ll Need
For my signature cheesy pull-apart garlic bread, I use ingredients that are easily accessible but combine to create something extraordinary:
For the Garlic Butter:
- 1 cup (226g) unsalted butter, softened
- 8 cloves fresh garlic, minced (about 3 tablespoons)
- 3 tablespoons fresh parsley, finely chopped
- 2 tablespoons fresh chives, finely chopped
- 1 tablespoon Italian seasoning
- 1 teaspoon sea salt
- ½ teaspoon freshly ground black pepper
- ¼ teaspoon red pepper flakes (optional, for heat lovers)
For the Bread:
- 1 large crusty artisan loaf or sourdough boule (about 1 pound)
For the Cheese Filling:
- 2 cups mozzarella cheese, freshly shredded
- 1 cup sharp cheddar cheese, freshly shredded
- ½ cup parmesan cheese, freshly grated
- 2 tablespoons cream cheese, softened
Equipment Needed
Nothing fancy required here, just some basics:
- Sharp serrated knife
- Mixing bowl
- Pastry brush
- Aluminum foil
- Baking sheet
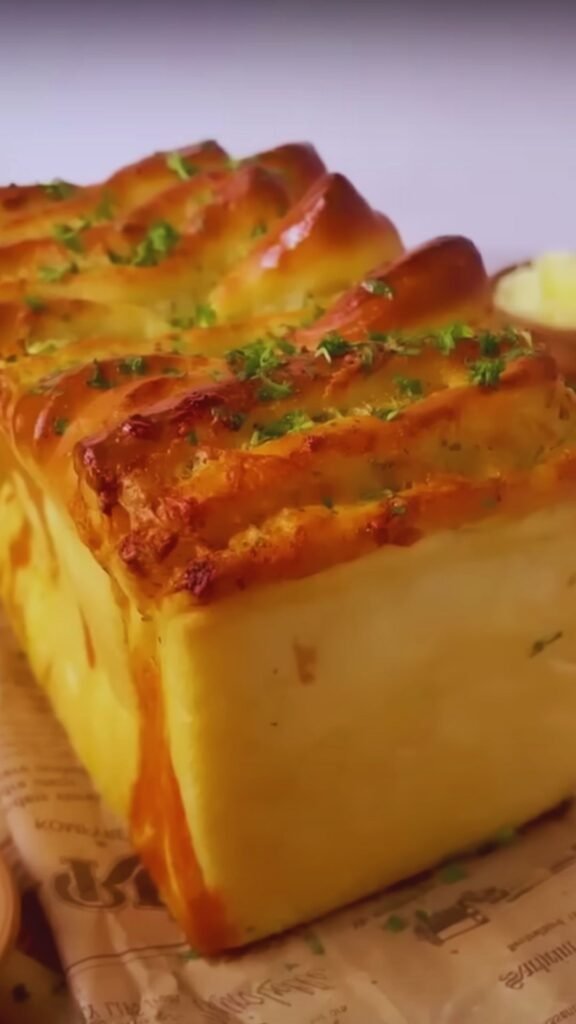
Preparation: The Art of the Cut
The way you cut your bread can make or break this recipe. Here’s my foolproof method for perfect cuts:
- Place your bread loaf on a cutting board and use a sharp serrated knife to make parallel cuts across the loaf, about 1 inch apart
- Important: Cut down almost to the bottom but not all the way through—leave about ½ inch intact at the base
- Rotate the loaf 90 degrees and make perpendicular cuts with the same spacing, creating a grid pattern
- Again, don’t cut all the way through—these partial cuts create the “pull-apart” sections while keeping everything connected
Step-by-Step Recipe
1. Prepare the Garlic Butter Mixture
I always start by making the garlic butter mixture, allowing the flavors to marry while I prepare the bread.
- In a mixing bowl, combine the softened butter, minced garlic, chopped herbs, Italian seasoning, salt, pepper, and red pepper flakes (if using)
- Mix thoroughly until all ingredients are well incorporated
- Let this mixture rest for 10-15 minutes to allow the flavors to meld together
2. Prepare Your Cheesy Mixture
While the garlic butter is resting:
- In a separate bowl, combine the shredded mozzarella, cheddar, and half of the parmesan
- Add the softened cream cheese and mix well
- The cream cheese acts as a binder and adds a wonderful creaminess to the final product
3. Preheat and Prepare
- Preheat your oven to 375°F (190°C)
- Line a baking sheet with aluminum foil (this will catch any butter or cheese that escapes during baking)
4. Assemble Your Masterpiece
This is where the magic happens:
- Place your cut bread on the prepared baking sheet
- Using a pastry brush or spoon, generously apply the garlic butter mixture between each cut in the bread
- Take your time here—make sure every nook and cranny gets some buttery goodness
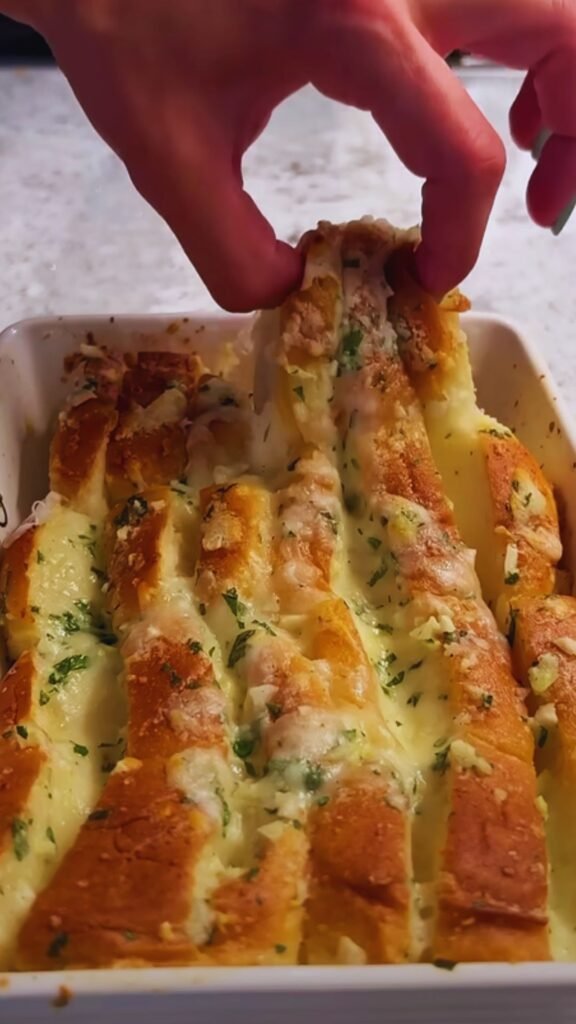
- Once the butter is distributed, stuff the cheese mixture between all the cuts
- Be generous with the cheese, ensuring it goes deep into the crevices
- Sprinkle the remaining parmesan cheese over the top of the loaf
5. Bake to Perfection
- Cover the bread loosely with aluminum foil
- Bake for 15 minutes covered to allow the bread to warm through and the butter to melt into every crevice
- Remove the foil and bake for an additional 10-12 minutes until the cheese is melted, bubbly, and beginning to brown on top
- For an extra crispy top, broil for the final 2 minutes, watching carefully to prevent burning
6. The Grand Finale
- Remove from the oven and let rest for 5 minutes (if you can resist!)
- Transfer to a serving board or plate
- Garnish with additional fresh herbs if desired
And voila! You’ve created a showstopping centerpiece that doubles as the most addictive side dish ever.
The Science Behind That Perfect Cheese Pull
Have you ever wondered what makes that dramatic cheese pull so satisfying? It’s not just for Instagram—there’s actual science behind it!
The key lies in the protein structure of cheese. When cheese melts, its proteins relax and form long, elastic strands. Different cheeses have different melting properties based on their moisture content, age, and acidity.
That’s why I use a blend in this recipe:
| Cheese Type | Contribution to Recipe | Melting Properties |
|---|---|---|
| Mozzarella | Creates those long, dramatic cheese pulls | High moisture content creates elasticity |
| Cheddar | Adds sharp, complex flavor | Contains more fat, creating a creamy melt |
| Parmesan | Provides savory depth and crispy edges | Lower moisture creates textural contrast |
| Cream Cheese | Acts as a binding agent | Smooth, creamy texture that helps other cheeses melt evenly |
By combining these cheeses, we get the best of all worlds: stretchy, flavorful, and visually impressive results that will have everyone reaching for their phones to capture the moment.
Common Mistakes to Avoid
In my years of perfecting this recipe, I’ve made plenty of mistakes so you don’t have to:
- Using pre-shredded cheese – These contain anti-caking agents that prevent proper melting. Always grate your own for best results
- Cutting all the way through the bread – This creates slices rather than connected pieces, losing the “pull-apart” effect
- Using cold butter – Room temperature butter spreads more easily and distributes flavor better
- Skimping on the garlic – Fresh garlic is key; pre-minced doesn’t provide the same punch
- Rushing the baking process – The covered baking stage is crucial for allowing the flavors to penetrate the bread
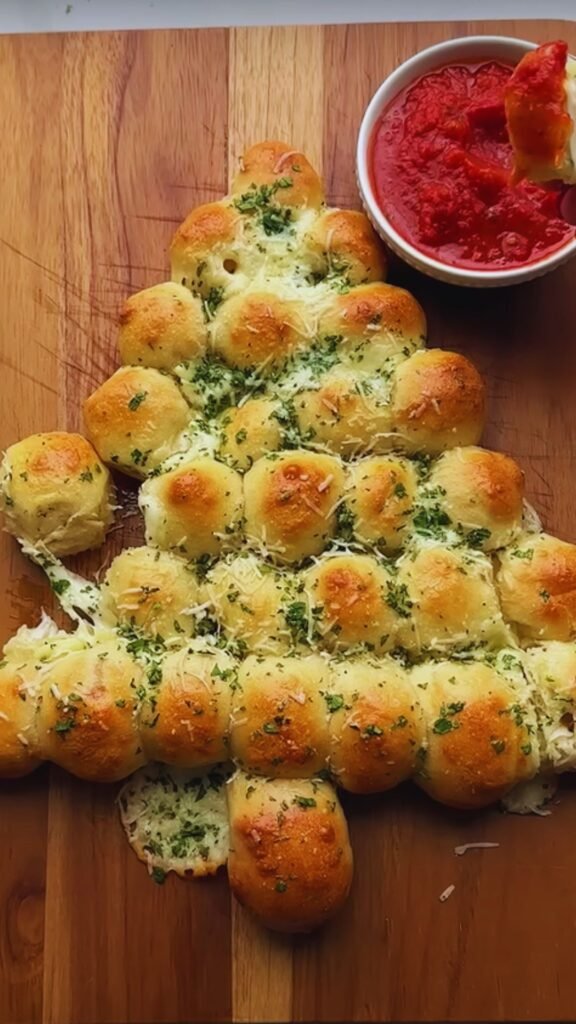
Creative Variations to Try
While my classic recipe is a crowd-pleaser, I love experimenting with different flavor combinations:
Mediterranean Style
- Add chopped sun-dried tomatoes, olives, and crumbled feta to the cheese mixture
- Use a blend of oregano, thyme, and basil in place of Italian seasoning
- Drizzle with olive oil before serving
Spicy Southwest
- Add pickled jalapeños and corn kernels between the cuts
- Use pepper jack in place of cheddar
- Mix in a teaspoon of cumin and chili powder to the butter
- Serve with guacamole for dipping
French Onion
- Add caramelized onions to the cheese mixture
- Use Gruyère cheese instead of cheddar
- Add a dash of Worcestershire sauce to the butter mix
- Sprinkle with fresh thyme
Make-Ahead Tips
Need to prepare in advance? I’ve got you covered:
- Prep the bread and butter mixture up to 24 hours ahead – Cut the bread and prepare the garlic butter, then wrap the bread tightly in plastic wrap and refrigerate both separately
- Partially bake ahead of time – Bake covered for the first 15 minutes, then cool, wrap, and refrigerate; finish the baking process just before serving
- Freeze for future use – After cutting and before adding butter/cheese, freeze the whole loaf; thaw completely before continuing with the recipe
Nutritional Information
For those who like to keep track, here’s the approximate nutritional breakdown per serving (assuming the loaf serves 8):
| Nutrient | Amount per Serving |
|---|---|
| Calories | 385 |
| Total Fat | 27g |
| Saturated Fat | 16g |
| Cholesterol | 75mg |
| Sodium | 680mg |
| Total Carbohydrates | 24g |
| Dietary Fiber | 1g |
| Sugars | 2g |
| Protein | 13g |
Serving Suggestions
This cheesy pull-apart garlic bread elevates virtually any meal, but here are some of my favorite pairings:
- Pasta dishes – The obvious choice! From spaghetti with marinara to fettuccine alfredo
- Soups – Particularly tomato, minestrone, or Italian wedding soup
- Salads – Turn a simple Caesar salad into a complete meal
- Grilled meats – The perfect complement to steak, grilled chicken, or lamb
- On its own – Add a marinara dipping sauce on the side and call it dinner (I won’t judge!)
For a complete Italian feast, serve alongside my homemade lasagna or spaghetti Bolognese. The bread is perfect for sopping up any extra sauce!
Storage and Reheating Tips
If by some miracle you have leftovers (trust me, it’s rare):
- Refrigeration – Wrap tightly in aluminum foil and refrigerate for up to 3 days
- Reheating – Place in a 350°F (175°C) oven for 10-15 minutes until heated through
- Avoid the microwave – It will leave your bread soggy instead of crispy
Pro tip: To refresh day-old bread, sprinkle it with a few drops of water before reheating in the oven—this creates some steam and helps rejuvenate the texture.
Frequently Asked Questions
Can I use a different type of bread?
Absolutely! While I prefer artisan loaves or sourdough for their sturdy texture and flavor, you can use:
- French baguette
- Ciabatta
- Italian bread
- Even a round of homemade bread
Just adjust the baking time slightly depending on the density and size of your loaf.
Is there a dairy-free version?
Yes! You can make a delicious dairy-free version using:
- Plant-based butter
- Vegan cheese alternatives (look for ones specifically made for melting)
- Nutritional yeast for that savory, cheesy flavor
The technique remains the same, though you may need to adjust baking times as vegan cheeses melt differently.
Can I add meat to this recipe?
Definitely! Some delicious additions include:
- Crumbled, cooked bacon
- Pepperoni slices
- Prosciutto
- Cooked Italian sausage
Add these in the same step as the cheese for best results.
What if I don’t have fresh herbs?
While fresh herbs provide the best flavor, you can substitute dried herbs at a ratio of 1:3 (1 teaspoon dried for every tablespoon fresh). For the parsley and chives in this recipe, that would mean:
- 1 tablespoon dried parsley instead of 3 tablespoons fresh
- 2 teaspoons dried chives instead of 2 tablespoons fresh
How do I know when it’s done baking?
The perfect cheesy pull-apart garlic bread will have:
- Golden brown edges
- Fully melted, bubbly cheese
- A crisp exterior with a soft interior
- An internal temperature of about 165°F (74°C) if you’re using a food thermometer
The History Behind Garlic Bread
Did you know that what we call “garlic bread” is actually an Italian-American creation? Traditional Italian cuisine features “bruschetta,” which is grilled bread rubbed with garlic and topped with olive oil and salt.
The cheesy garlic bread we know and love today evolved in Italian-American communities during the mid-20th century, alongside the popularization of pizza and pasta dishes in American culture. It represents a beautiful fusion of Italian techniques with American abundance (particularly in the cheese department!).
By creating this cheesy pull-apart version, we’re continuing this tradition of culinary evolution—taking a beloved classic and reimagining it for modern tables and tastes.
Why This Recipe Works
After years of testing and tweaking, I can confidently say that this recipe works because it:
- Balances textures – The contrast between the crunchy exterior and soft, buttery interior creates an irresistible eating experience
- Layers flavors – Each element (butter, garlic, herbs, different cheeses) contributes something unique
- Creates anticipation – The very act of pulling apart the bread builds excitement before the first bite
- Promotes sharing – Food that encourages interaction creates memorable dining experiences
Whether you’re an experienced home cook or just starting out, this recipe offers room for both precision and creativity—follow it exactly or use it as a jumping-off point for your own signature version.
My Personal Touch
I still remember the first time I served this at a family gathering. My grandmother—a woman who rarely commented on “new-fangled” recipes—actually asked for the recipe. That’s when I knew I had created something special.
What makes my version unique is the combination of three cheeses plus the addition of cream cheese for enhanced melting, and the double-crosshatch cutting technique that creates more surfaces for the butter and cheese to cling to. These small details make a big difference in the final result.
The most important ingredient, though, isn’t listed above—it’s the care taken in preparation. When food is made with attention and love, people can taste it. This cheesy pull-apart garlic bread might seem like a simple side dish, but when prepared thoughtfully, it becomes the dish everyone remembers.
Questions & Answers
Do I really need to use freshly grated cheese?
Yes! Pre-packaged shredded cheese contains anti-caking agents that prevent it from melting properly. Freshly grated cheese will give you that gorgeous, stretchy cheese pull that makes this recipe so special.
My bread didn’t get crispy on the outside. What went wrong?
The most common cause is covering the bread with foil for the entire baking time. Remember to remove the foil for the last 10-12 minutes of baking to allow the exterior to crisp up. Also, make sure your oven is fully preheated before baking.
Can I prepare this in an air fryer?
Absolutely! Prepare as directed, then air fry at 320°F for about 10 minutes or until the cheese is melted and the top is golden brown. Keep in mind that you may need to use a smaller loaf depending on your air fryer’s size.
How can I tell if my garlic is fresh?
Fresh garlic cloves should be firm to the touch, with tight, papery skin. If you notice green sprouts in the center when you cut into them, the garlic is past its prime but still usable—just remove the sprout which can taste bitter.
What’s the best way to serve this at a party?
For parties, I sometimes prepare two smaller loaves instead of one large one. This allows you to place them at different ends of the table so everyone has access. You can also consider preparing and partially baking ahead of time, then finishing the baking just before guests arrive for that dramatic fresh-from-the-oven appeal.
So there you have it—my complete guide to creating the cheesy pull-apart garlic bread that will undoubtedly become your new signature dish. Remember, the best recipes are the ones you make your own, so don’t be afraid to experiment with different cheeses, herbs, and add-ins to suit your taste.
Happy baking, and prepare for the moment when everyone at the table falls silent—except for the occasional “mmm” as they savor each cheesy, garlicky bite!